Project 2: Processes and Time-Sharing the CPU
At the end of Project 1, your operating system could load a program into memory, run it, and—once that program was finished—load and run the next one. That is batch processing, and it is how computers worked until the early 1960s. It has one serious problem: at any moment, exactly one program exists, and while it runs, nothing else can happen. If that program stops to wait for a slow event, the CPU waits with it.
In this project, you will fix that. By the end, your OS will hold several processes in memory at the same time and switch the CPU between them—first when a process politely asks (cooperative concurrency), and then whether it likes it or not (preemptive concurrency). You will write the code that takes a running program’s registers off the CPU, puts another program’s registers on, and resumes it as if nothing had happened. You will also program the CPU’s hardware exception handlers and set up a hardware timer so that your kernel gets control back periodically, even from a program that never gives it up voluntarily.
This is the point in the course where your OS starts to look like a real one. The mechanism you are about to build—the context switch—is the beating heart of every multitasking operating system ever written. Linux does it a few thousand times a second per core; so will yours.
A note on what you already have. This project builds directly on your Project 1 code: your bootup assembly, your UART driver, your printf, your panic, and your ELF loader. If parts of Project 1 don’t work, fix them first—you will be debugging concurrency in this project, and debugging concurrency on top of a broken baseline OS will be miserable. Come to office hours if you need help getting your Project 1 code into shape.
Learning objectives
After completing this project, you will be able to:
- Explain one major reason why an operating system runs multiple programs at once. Hardware devices are slow compared to the CPU. If only one program can exist at a time, the CPU sits idle whenever that program waits for I/O. Running several programs concurrently lets the OS multiplex a fast CPU across slow devices.
- Explain how a context switch is implemented in a kernel, and implement one: what exactly constitutes a process’s “context”, where it is stored, and what it takes to take it off and put it back on the CPU.
- Explain how cooperative concurrency works via a
yield()call, and implement it—including why a process that callsyield()eventually returns from it as though nothing had happened. - Explain why preemption is necessary. A program that never yields would otherwise run forever; and when a device finishes an I/O operation, something must respond promptly. Both require a way to interrupt a running program.
- Explain how preemptive concurrency works, and implement it: how a hardware timer is programmed, what happens in hardware when it fires, and how the kernel turns that event into a scheduling decision.
- Explain the difference between a synchronous exception and an interrupt, and describe precisely what the CPU does—and, crucially, what it does not do—when either occurs. You will also learn what an exception vector table is and why a kernel must program one into the hardware before it can handle anything.
- Explain that different scheduling algorithms exist and that they trade off against each other. You will implement round-robin scheduling; students in CS 1690/2670 will implement something more sophisticated and argue about what it optimizes for.
CS 1670 vs. 1690/2670
As in Project 1, all students share the same core project, but students in CS 1690/2670 complete extra work and run their code on real hardware.
Here is a summary of the quests you must complete for this project, based on which course you’re enrolled in:
| CS 1670 | CS 1690/2670 |
|---|---|
| Complete quests 1–4 in QEMU (emulated Raspberry Pi). | Complete quests 1–4 in QEMU (emulated Raspberry Pi). |
| Complete quest 5 (a scheduling algorithm beyond round-robin). | |
| Run your OS on real hardware (Raspberry Pi). |
Roadmap
The project has five quests, which build on each other. Quests 1–4 are required for everyone; quest 5 is for CS 1690/2670 only.
| Task | What you build | What you learn |
|---|---|---|
| 1. Many processes | A transition from EL3 to EL1 in boot.S; a process table, PIDs, and per-process memory regions; an ELF loader that can load several programs, each at its own address. | ARM64 exception levels; what a process descriptor is; that concurrency starts with a memory-layout decision. |
| 2. Contexts | A context_t struct and save_context/restore_context in ARM64 assembly; an initial context per process; starting a process by restoring a context. | What a CPU context is, where it lives, and exactly what it takes to put one on the CPU. |
| 3. Cooperative concurrency | A yield() function exposed to user programs, and a round-robin scheduler. | Cooperative concurrency; the distinction between scheduling mechanism and policy; why cooperation is not enough. |
| 4. Preemptive concurrency | An exception vector table, a timer device driver, and interrupt handling. | Synchronous exceptions vs. interrupts; what the hardware does on an exception; preemption. |
| 5. A better scheduler (CS 1690/2670) | One scheduling algorithm more sophisticated than round-robin, plus a short write-up. | That scheduling policy is an OS design choice with trade-offs. |
Read the Background section before you start: it gives you the conceptual foundation that all five quests build on. Each quest then opens with its own background material—the concepts and ARM64 details that quest specifically needs. Work through the quests in order; each one depends on the one before it.
Assignment Installation
You will keep working in the same private GitHub repository you used for Project 1.
To pull in the new files for this project (new empty source files and an updated build system), run the following in your project directory:
git pull handout mainIf this reports an error about an unknown remote, run:
git remote add handout git@github.com:csci1670/cs1670-f26-projects.gitand then git pull handout main again.
Merge conflicts. Unlike in Project 1, you now have your own code in files that we also ship, so git pull may produce merge conflicts. Resolve them by keeping your implementation and adding whatever we provide alongside it. Two places are likely:
Makefile. We have added the new source files to the list of kernel objects to build. If you edited that list yourself during Project 1, keep both sets of additions.kernel/init.c. We have addedexterndeclarations for the two new user programs. Keep them and yourinit()function. If you get stuck in a merge,git merge --abortgets you back to where you started; then come to office hours.
Code Structure
As in Project 1, you write all the significant code yourself; we provide a build system and a skeleton of (mostly empty) files that suggests how to organize it. Here is what is new or changes in this project:
.
├── Makefile
├── kernel/
│   ├── aarch64.h              Quest 1: SCTLR/HCR/SPSR constants (we provide these)
│   ├── boot.S                 Quest 1: move from EL3 to EL1
│   ├── debug.h                DEBUG() and CHECK() macros (we provide these)
│   ├── constant.h             Quest 2: the size of a saved context
│   ├── context.S              Quest 2/3: save_context, restore_context, yield_entry
│   ├── context.h              Quest 2: declarations for the above
│   ├── proc.c, proc.h         Quest 1: struct proc, the process table, allocproc()
│   ├── limits.h               Quest 1: NPROC, PROC_START, PROC_SIZE
│   ├── scheduling.c, .h       Quest 3: yield(), scheduler(), pick_next()
│   ├── exceptions.S           Quest 4: the exception vector table
│   ├── exceptions.h           Quest 4: exception_init(), exception_vector_table
│   ├── interrupts.c           Quest 4: interrupt dispatch and DAIF helpers
│   ├── interrupts.h           Quest 4: interrupt controller registers to fill in
│   ├── drivers/
│   │   ├── timer.c, timer.h   Quest 4: the timer device driver
│   │   ├── uart.c, uart.h     (yours, from Project 1)
│   │   └── gpio.h             (yours, from Project 1)
│   ├── elf.c, elf.h           (from Project 1; Quest 1 changes the loader)
│   ├── init.c                 Quest 1: create and load all processes
│   ├── kernel.c               Quests 1--4: kernel_main
│   ├── memlayout.h            Quest 3: add F_YIELD
│   └── ...
└── user/
    ├── hello.c                 provided: prints, then yields, forever
    ├── counter.c               provided: prints a counter, then yields, forever
    │                           (both: uncomment their yield() call in Quest 3)
    ├── primecheck.c           (from Project 1) never yields: a CPU hog
    ├── u_common.h             Quest 3: add the user-side yield()
    └── ...
Building and running
Nothing changes from Project 1: the build system uses make, and the important targets are
$ make qemu        # build the image and run it in QEMU
$ make qemu-gdb    # same, but pause and wait for a debugger to attach
$ make clean       # remove build artifacts
Remember that to quit QEMU you type Ctrl-a then x. You will be doing this a lot in this project, because a broken context switch usually manifests as a hang.
Debugging concurrency is different. Up to now, your OS did one thing at a time and a bug meant “this code is wrong”. From now on, a bug can also mean “this code is right, but it ran at the wrong time”. Appendix C collects the techniques and gdb recipes that help most; read it before you start Quest 2, not after you have been stuck for three hours. Appendix D covers the CHECK() and DEBUG() macros we provide in kernel/debug.h, which let you catch a broken invariant at the moment it breaks rather than hours downstream.
Background
Why does an operating system run more than one program at a time?
The honest answer is not “so the user can check email while compiling”—that came much later. The original reason is that hardware devices are unbelievably slow compared to a CPU, and a computer that can only hold one program spends most of its time waiting.
You can see this in your own Project 1 code. Your uart_send function does this:
while (/* the transmit FIFO is full */) {
    // spin
}
At 115,200 baud with 8N1 framing, the UART needs 10 bit-times to move one character, which is about 87 microseconds. The Raspberry Pi 3B+’s CPU runs at 1.4 GHz, so in those 87 microseconds it could have executed roughly 120,000 instructions. Your OS throws every one of them away, per character. Print an 80-character line and you have burned about ten million instructions doing nothing at all.
Now imagine a 1960s tape drive or a card reader, which were a thousand times slower still. This is the problem that drove the invention of the process: if the machine can hold several programs, then when one of them waits for a device, the OS can put a different one on the CPU. The CPU stays busy; the expensive machine gets used.
We are not going to fix the UART send busy-wait in this project. Doing so requires an interrupt-driven UART driver, and a way for a process to say “wake me when the device is ready”—which in turn requires blocking. You will implement this in Project 3. For now, you will focus on understanding why the ability to run several programs concurrently is required, and you’ll implement the mechanisms that make it happen. There is an extra-credit quest at the end of Quest 4 if you want a taste.
Isolation and controlled sharing
Once several programs coexist on one machine, the OS acquires a second job beyond abstraction and mediation: it must isolate programs from one another while letting them share the hardware in a controlled way. For every resource, the OS has to answer two questions: who is allowed to touch it? and how do we divide it up?
| Resource | Where you’ll deal with it |
|---|---|
| CPU time | This project. |
| I/O devices | Project 3 (screen, keyboard). |
| Memory | Project 5 (virtual memory), where isolation becomes enforceable. |
| Files | Project 6 (file system). |
For now, your processes will run at the same privilege level as your kernel, which means they could scribble over the kernel’s memory or each other’s if they wanted to. There is no protection boundary yet—that is what projects 4 and 5 are for. For now, we assume programs are well-behaved and concentrate on dividing the CPU up.
So is a "process" here really a process?
Not quite, and it is worth being precise about it. A process in a modern OS is an isolated execution environment: its own address space, its own file descriptors, its own privileges. What you are building in this project is the scheduling half of a process: an independent thread of execution with its own registers and its own stack, plus a kernel data structure that describes it.
Because you have no virtual memory yet, all of your “processes” share one physical address space and run in kernel mode. To differentiate them from fully-fledged processes, we refer to them as kernel processes (kprocs). Such fully-privileged processes actually existed in real OSes: for example, all processes on classic MacOS, on MS-DOS, and in early versions of Windows ran in privileged mode. In modern terminology, these processes are closer to so-called “kernel threads”. We will keep calling them “processes” because the data structure you build now (struct proc) is the same one that grows into a real process descriptor over the next projects.
Cooperative and preemptive concurrency
There are two ways the kernel can get the CPU back from a running process.
Cooperative concurrency: the process gives it up voluntarily, by calling into the kernel. In this project that call is named yield(), and it means “I have nothing urgent to do right now; let someone else run”. Cooperative scheduling is simple and it was how the earliest multiprogramming systems (and, much later, classic MacOS and Windows 3.x) worked. It has one fatal flaw: it depends on every single program being polite. One program with an infinite loop—or just a long computation, or a bug—and the machine is dead until you power-cycle it.
Preemptive concurrency: the kernel takes the CPU back whether the process cooperates or not. It does this by arranging for a hardware timer to interrupt the CPU periodically. When the timer fires, the CPU stops executing the process and jumps into the kernel; the kernel can then decide to run somebody else. The interval a process gets before the timer fires is its quantum (or time slice).
Preemption is not only a defense against impolite programs. It is also what makes timely response to devices possible: when a network packet arrives or a disk finishes a read, the OS often has to act within microseconds, as the device stores data in a limited memory region that will otherwise get overwritten with new data (e.g., another network packet, the next key press, more data from disk, etc.). So, the CPU cannot wait for whatever program happens to be running to finish first. Both needs—defending against non-yielding programs, and responding to hardware promptly—come down to the same requirement: the CPU must be interruptible.
You will build both mechanisms: cooperative in Quest 3, preemptive in Quest 4. They will share the same context-switch code, which is not a coincidence.
Quest 1: Many processes in memory
Files: kernel/boot.S, kernel/aarch64.h, kernel/proc.c, kernel/proc.h, kernel/limits.h, kernel/elf.c, kernel/init.c, kernel/kernel.c.
Overview
Before you can switch between kernel processes, you need more than one process to switch between. In this quest you will:
- Change the bootup code to move your CPU into the right “exception level” (EL), from EL3 to EL1. This is needed so that the exception machinery you need in the rest of the project is available to you.
- Introduce the data structure that represents a process: a process descriptor (
struct proc), a process ID (PID), and a process table. - Change your ELF loader so that it can load several programs into different regions of physical memory, and load three of them.
At the end of the quest, your OS will hold three kernel processes, all of them loaded and ready to run, and it will run one of them. It cannot yet switch between processes—that’s Quests 2 and 3—but everything a switch needs will be in place.
Why are we doing this?
Batch processing lets you get away with a beautiful simplification: since only one program existed at a time, it could always be loaded at the same address, and the kernel needed to remember essentially nothing about it. Multiprogramming changes this: several programs must be resident simultaneously, which means they must be at different addresses, which means the kernel must decide on those addresses and remember them. And once the kernel is remembering things about a program, it needs somewhere to put them. This is what a process descriptor is for.
This is a pattern you will see repeatedly in OS design: a new capability forces the kernel to start tracking state, and that state becomes a data structure that the rest of the kernel is organized around. struct proc is the most important such structure in any kernel.
What you need to do
Part A: more bootup configuration
When a machine starts up, the hardware is generally in the most privileged state possible. Early code running during bootup then reduces privilege levels, until eventually unprivileged user processes can run. On ARM64, there are four privilege levels, called exception levels (EL0–EL3). The CPU starts in EL3, where your bootup code runs. You will now drop it two more levels, to EL1.
Background: ARM64 exception levels
ARM64 CPUs run code at one of four exception levels, EL0 through EL3. Higher numbers are more privileged:
| Level | Conventionally used for | In your OS |
|---|---|---|
EL3 | Secure monitor / firmware | Where our Raspberry Pi boots and your code runs today! |
EL2 | Virtual machine management (Hypervisor) | Not used (but could be a final project!) |
EL1 | OS kernel | Where your kernel should run, from this project onward and where your kernel processes run. |
EL0 | User programs | Where your processes will run, starting in Project 4. |
The CPU has a lot of system registers. We’ve seen some of these already in Project 1 (e.g., MPIDR_EL1, which your bootup code uses to identify the active CPU core), and you will see many more in this project. Importantly, system registers often have multiple instances, each specific to an exception level.
This split is called banked registers. Each level has its own copies of a lot of system registers: for example, there is an ELR_EL1 and an ELR_EL3, an SPSR_EL1 and an SPSR_EL3, a VBAR_EL1 and a VBAR_EL3, and separate stack pointers SP_EL0, SP_EL1, SP_EL2, and SP_EL3. This split both simplifies writing code (as you don’t need to worry about messing up another exception level’s state) and makes the architecture more flexible (as you can have functionality specific to an exception level). You haven’t learned about what these registers do yet (Appendix A tells if you you’re curious), but for now it sufficies to know that the different copies exist. Code running at EL3 uses the _EL3 copies, while code running at EL1 uses the _EL1 copies.
Moving to a less-privileged (lower-numbered) an exception level is done with the eret assembly instruction. That is the same instruction you will use for context switches, and it works the same way: eret at EL3 sets pc from ELR_EL3 and PSTATE from SPSR_EL3, and the mode bits in SPSR_EL3 say which exception level to land in.
When QEMU (or the Raspberry Pi’s firmware) starts your kernel image, it hands control to you at EL3.1 Your Project 1 boot.S never changed that, so your kernel has been running in EL3 this whole time (see the background above). This didn’t matter, because nothing you did in Project 1 cared. But you need it at EL1 now: everything in this project is built on the EL1 registers,2 and Project 4 needs EL1 so that your processes can drop to EL0 and finally be isolated.
The transition happens at the end of your bootup code, before you jump into C, and it involves configuring a bunch of system registers. The details aren’t super important at this point, so we provide you with a code snippet to do this. If you are curious, you can read the details below.
EL3-to-EL2 transition details
EL3 is usually used for low-level firmware or bootloader code that needs to handle very basic configuration of the system, such as whether to boot in “secure” or “non-secure” mode, and whether to use 32-bit or 64-bit ARM machine code. The constants we provide you with are the right values for this project, but if you want to understand what they mean or write the code yourself, read on.
Here’s what your code needs to do, and what our provided code does:
- Configure
SCR_EL3, the System Control Register for EL3. This primarily involves telling the processor that we want to boot in “non-secure” (NS) mode (i.e., without secure boot), and that the EL2 code is 64-bit (AArch64). UseSCR_VALUE_EL3fromaarch64.h. - Set up the return state. Write
SPSR_EL3with thePSTATEyou want to land in: EL2 using the EL2 stack pointer (EL2h), with all interrupts disabled (“masked”)—you have no interrupt handlers yet, and experiencing a hardware interrupt before you install them would be fatal. UseSPSR_VALUE_EL3. Then writeELR_EL3with the address you want to resume at, which is a label at the start of your EL2 code. eret. The CPU setspcfromELR_EL3andPSTATEfromSPSR_EL3, and you are now at EL1.
EL2-to-EL1 transition details
ARM64 CPUs are amazingly configurable. The system registers we’re setting here configure the hardware to behave in specific ways: e.g., with CPU caches and virtual memory turned off, and running in 64-bit mode. The constants we provide you with are the right values for this project, but if you want to understand what they mean or write the code yourself, read on.
Here’s what your code needs to do, and what our provided code does:
- Configure
SCTLR_EL1, the System Control Register for EL1. This register controls the Memory Management Unit (MMU), the caches, and the endianness of EL1 and EL0. You want the MMU disabled (as you have no page tables yet), caches disabled (simpler, as you avoid caches getting into the way of memory-mapped I/O), and little-endian byte order. A few reserved bits must also be set to 1. We give you the constants for this inkernel/aarch64.h: useSCTLR_VALUE_MMU_DISABLED. - Configure
HCR_EL2, the Hypervisor Configuration Register. You must set itsRWbit (bit 31), which selects whether EL1 and EL0 execute on a 64-bit architecture (AArch64) or 32-bit architecture (AArch32). Its reset value selects AArch32, so if you skip this step, youreretwill drop you into 32-bit mode and your 64-bit kernel will disintegrate immediately. UseHCR_VALUE_EL2. - Set up the return state. Write
SPSR_EL2with thePSTATEyou want to land in: EL1 using the EL1 stack pointer (EL1h), with all interrupts disabled (“masked”)—you have no interrupt handlers yet, and experiencing a hardware interrupt before you install them would be fatal. UseSPSR_VALUE_EL2. Then writeELR_EL2with the address you want to resume at, which is a label at the start of your EL1 code. eret. The CPU setspcfromELR_EL2andPSTATEfromSPSR_EL2, and you are now at EL1.
Here’s the code you need to add to kernel/boot.S to do this. It goes after the code that parks the non-boot cores, but before you set up the stack and jump into C. You should move the code that sets up the stack and jumps into C to a new label, el1_entry, which is where the CPU will jump after the eret instruction.
This code refers to constants like SCTLR_VALUE_MMU_DISABLED that we define for you in aarch64.h, so you will need to add a #include "aarch64.h" to the top of boot.S. Recall that #include merely copies the file’s contents into the assembly file, so all this does is adding the contents of aarch64.h here. A C header included from assembly can only contain constants and function declarations; it cannot contain actual C code as the assembler would not know how to compile it.
// Only processor 0 runs this code
processor0_el3:
    // Switch from EL3 to EL2
    ldr  x0, =SCR_VALUE_EL3  // Set values in System Control Register; see aarch64.h.
                             // NS=1 (non-secure), RW=1 (EL2 runs AArch64)
    msr  SCR_EL3, x0
    ldr  x0, =SPSR_VALUE_EL3 // Set values in the Saved Program Status Register (SPSR); see aarch64.h.
                             // return to EL2h, DAIF masked (no interrupts)
    msr  SPSR_EL3, x0
    adr  x0, processor0_el2
    msr  ELR_EL3, x0         // Store the address of processor0_el2 into the exception link register
                             // for EL3, meaning that `eret` will use it as the return address and
                             // jump to it.
    eret                     // Exception return; changes the exception level from EL3 to EL2 and
                             // jumps to the address in the ELR_EL3 register (which is processor0_el2)

processor0_el2:
    ldr   x0, =SCTLR_VALUE_MMU_DISABLED
    msr   SCTLR_EL1, x0  // Set values in System Control Register; see aarch64.h.

    ldr   x0, =HCR_VALUE_EL2
    msr   HCR_EL2, x0    // Set values in Hypervisor Configuration Register (HCR); see aarch64.h.

    ldr   x0, =SPSR_VALUE_EL2
    msr   SPSR_EL2, x0   // Set values in the Saved Program Status Register (SPSR); see aarch64.h.

    adr   x0, el1_entry
    msr   ELR_EL2, x0    // Store the address of el1_entry into the exception link register
                         // for EL2, meaning that `eret` will use it as the return address
                         // and jump to it.

    eret                 // Exception return; changes the exception level from EL2 to EL1 and jumps
                         // to address in the ELR_EL2 system register.
Explanation of the syntax used
ldr x0, =SOME_CONSTANTloads a big constant from a literal pool. You need to use this for theSCTLR/HCR/SPSRvalues, since they are too large for amovimmediate.adr x0, some_labelgets you the address of a label, which is whatELR_EL2needs.- Reading and writing system registers uses
mrs(read) andmsr(write), nevermov. - If you’re curious, read the comments in
kernel/aarch64.h: they explain what each bit in each constant means. This is one of the few places in the course where you can see exactly which architectural knobs a kernel has to set.
Notice the banked system registers in action: here, the most important one to note is that each exception level has its own stack pointer. At EL3 you were using SP_EL3; at EL1 you use SP_EL1. They are different registers, and the sp register is merely an alias for the SP_ELx at the current exception level.
Therefore, whatever value you put in sp before the eret is not the value you will find in sp afterwards. This means your mov sp, #INITIAL_KERNEL_STACK must come after the eret, in your EL1 code after the el1_entry label.
Task: Extend kernel/boot.S based on the code above, so after parking the non-boot cores, the boot core transitions from EL3 to EL1 and then sets up the stack, zeroes .bss, and calls kernel_main.
You will need to add a #include "aarch64.h" to the top of boot.S so that the constants are available.
🤖 AI coding: auxiliary use allowed. You can use AI to help you understand the above assembly, and to help you debug whether you’ve inserted it correctly into boot.S.
Why? You’re copying code, so there’s not much coding to be done here that AI could help with. As in Project 1, asking AI to explain ARM64 exception levels or a particular system register makes sense as the output is much more approachable than the ARM manual.
For context, see the principles around AI use in CS 1670.
To check that the exception level transition worked, you can do one of the following:
- In GDB,
p/x $cpsrshowsPSTATE. Its lowest four bits are the mode:0b1001is EL2h,0b0101is EL1h. Watch it change across youreretby single-stepping the assembly code. - Run with
make qemu-verbose, which has QEMU print all exception level changes. You should see output along the lines of “Exception return from AArch64 EL2 to AArch64 EL1 PC 0x8003c”. - You can write small helper,
current_exception_level(), that returns the exception level the CPU is currently at. TheCurrentELsystem register holds it in bits 3:2, so usemrsand some bit-shifting assembly to extract the number and return it. The function needs to be written in assembly, either directly inboot.Sor as inline assembly in C (use AI to help you with the syntax). You can use your helper function print your exception level fromkernel_main.
If your kernel dies right after the eret, the two overwhelmingly likely causes are (a) you forgot either SCR_EL3.RW or HCR_EL2.RW, so you are now running in 32-bit mode, or (b) sp is garbage because you set it before the eret.
Part B: the process table
In the next step, you will define some data structures necessary for running multiple processes. You will define a process descriptor (struct proc), a process table (an array of descriptors), and a current process pointer.
Background: process descriptors, PIDs, and the process table
A process descriptor (also called a process control block, or PCB) is the kernel’s record of one process. In Linux it is struct task_struct and has several hundred fields; in your OS it will start with far fewer and you get to decide what to include. It needs, at minimum:
- State. Is this descriptor in use at all? Is the process ready to run? Is it running right now? You will represent this with an enum:
UNUSED(a free slot in the table),USED(allocated, being set up, not yet runnable),RUNNABLE(ready to run, but not on the CPU),RUNNING(on the CPU right now). - A PID. An integer that identifies the process. PIDs exist so that the kernel—and, later, user programs—can refer to a process without holding a pointer to kernel memory.
- A name, purely so that your debugging output is readable. This is not strictly necessary and real kernels keep it for the same reason.
- A pointer to its stack. Where this process’s stack lives in memory. Each process needs its own stack.
- A pointer to its saved context. Empty until Quest 2.
You might also include information such as the process’s load address in memory and its entry point (from the ELF loader). This is not strictly necessary, but it makes it easier to print your process table (see below) and debug later.
The process table is just an array of descriptors, sized by a compile-time constant. This may seem crude, but is actrually how early Unix did it, and how many embedded kernels do it today. Since you have no dynamic memory allocation yet, your kernel supports a fixed maximum number of processes, and “create a process” means “find an UNUSED slot”. It is unglamorous and it works.
Finally, the kernel needs to know which process is currently on the CPU, so it can find its descriptor when that process calls into the kernel. That is a single global pointer, conventionally called current_process, current (e.g., in Linux), or currproc.
Task: Define your process representation and the code that allocates one.
We suggest that you put this code into kernel/proc.h and kernel/proc.c, but you can put it elsewhere if you prefer. You may wish to add a few constants to kernel/limits.h as well.
In a header file (such as kernel/proc.h), define:
- An enum for process state:
UNUSED,USED,RUNNABLE,RUNNING. - A
struct procwith (at least) the process’s state, its PID, a short name for debugging, a place for its saved context (add this in Quest 2), and the top of its stack.
In a header (e.g., kernel/limits.h), use a #define macro to define the constants that configure the maximum number of processes (e.g., NPROC; 16 processes are fine for now), the address their process memory starts in physical memory (e.g., PROC_START), and the amount of memory allocated for each process (e.g., PROC_SIZE; 64 KiB per process is comfortable for our test programs).
In a C file (e.g., kernel/proc.c), define:
- Two global variables: the process table itself, e.g.,
struct proc process_table[NPROC], and the global current process pointer, e.g.,struct proc* current_process. - A function to allocate a process (e.g.,
allocproc()) that finds anUNUSEDslot in the table, marks itUSED, assigns it a PID, computes the memory location of its stack, and returns a pointer to it. It shouldpanic()if the table is full.
Hints
- The simplest PID scheme is “the PID is the index into
process_table”. It makesallocproctrivial and makes the memory layout arithmetic (PROC_START + pid * PROC_SIZE) obvious. Real kernels don’t do this—PIDs must not be reused quickly, for reasons you’ll appreciate in a later project—but it is right for now. If you prefer a monotonically increasing PID counter, you’ll need a separate field for the memory slot index. procsis a global, so the C standard says it starts zeroed—andUNUSEDis 0 if you list it first in the enum. That means a freshly booted process table is correctly all-UNUSEDwithout you doing anything. This only works because your Project 1boot.Szeroes.bss. (If you are not sure it does, this is a good moment to check.)- Remember that a stack pointer on ARM64 must be 16-byte aligned. Make sure the “top of stack” you compute satisfies that—which it will, if
PROC_STARTandPROC_SIZEare multiples of 16.
🤖 AI use/coding: auxiliary use allowed. You may use AI to discuss the design of your process descriptor, ask what fields real kernels keep in theirs, or check your memory-layout arithmetic. You may not have it generate the entire implementation for you.
Why? These are the data structures your entire kernel will be organized around for the rest of the course, and you will be editing them in every subsequent project. Deciding what goes in them—and why—is the kind of design thinking this course is about. But the surrounding questions (“how do real kernels do this?”) is something AI is good for.
For context, see the principles around AI use in CS 1670.
Part C: load several programs
Your Project 1 loader always loaded a program to the same place, because there was only ever one. Now it needs to load a program into a particular kernel process’s memory region.
Background: Deciding where kernel processes live in memory
You must now pick a physical memory layout. There is no virtual memory, so these are real physical addresses and it is entirely your responsibility to make sure nothing collides with anything else.
The simple scheme we recommend—and the one the rest of this handout assumes—is to pick an area of physical memory, carve it into NPROC fixed-size slots, and give kernel process pid the slot at
PROC_START + pid * PROC_SIZEWithin its slot, a process’s code and data go at the lowest address (its ELF segments are linked at addresses starting from 0, so segment address v lands at slot_base + v), and its stack starts at the highest address of the slot and grows towards lower addresses:
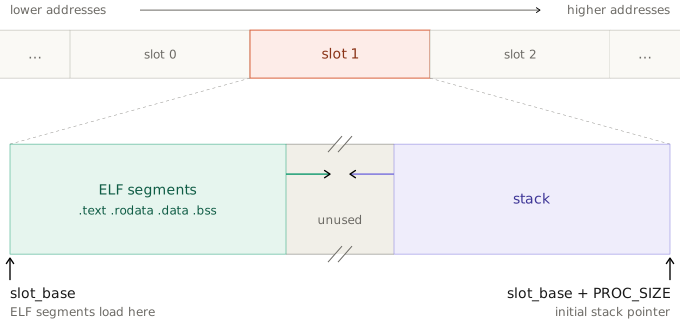
Nothing is protecting you here. If a kernel process’s stack grows far enough, it will silently overwrite that same kernel process’s own code and data segments. If your slots overlap, two kernel processes will silently overwrite each other. If PROC_START is too low, the kernel processes will silently overwrite your kernel. There is no MMU, so all of these produce no error message whatsoever—just baffling behavior.
Two specific things to check before you go further:
Your kernel process regions must start at a higher adress than the end of your kernel image in memory, including the embedded user executables. Your linker script defines a symbol for that: find out where
elf_executables_endlands withaarch64-elf-nm kernel/kernel-qemu.elf | grep -E 'kernel_end|elf_executables_end'(drop the
aarch64-elf-prefix if you are on in the container or on Linux, or useaarch64-linux-gnu-nm).Your kernel process regions must not collide with your kernel stack. You picked
INITIAL_KERNEL_STACKyourself in Project 1 (kernel/memlayout.h). Go look at what you picked. If it is inside the range you are about to hand out to kernel processes, move one of them.
In addition to process location, which is a choice for your OS design, we’ll introduce another convention to tell your kernel about the available executables. This one is not really a design choice: instead, it helps us make debugging easier and allows our autograder to check your work.
In a nutshell, we ask that you change your kernel to have two global arrays:
- An array called
executables, which holds the linker-provided symbols for all executables that you will load and run, in the order in which you will load/run them. The last element of this array must be anullptrsentinel, so that yourinitfunction can iterate through it without needing a separate count. - An array called
executable_names, which holds the names of those executables, in the same order. Similarly, the last element of this array must be anullptrsentinel.
Our build system uses these arrays to extract debug symbols for your processes (so that you can step through process code with GDB), and our grading server may at times replace your executables with a different set for testing. So, please use the names we provide, and no longer hardcode addresses or names in your loader or init function.
For example, your initial code that sets up these arrays and runs the processes could look like this:
extern char _binary_user_squares_elf_start[];    // Linker-generated, already exists in `init.c`
extern char _binary_user_pi_elf_start[];         // same
extern char _binary_user_primecheck_elf_start[]; // same

// All executables available
char* executables[] = {
    _binary_user_squares_elf_start,
    _binary_user_pi_elf_start,
    _binary_user_primecheck_elf_start,
    nullptr
};

// Names of the programs for debug output
char* executable_names[] = {
    "squares",
    "pi",
    "primecheck",
    nullptr
};

void init() {
    // [...]
    for (int i = 0; executables[i] != nullptr; i++) {
        struct proc* p = allocproc();
        strcpy(p->name, executable_names[i]);
        load_elf_into_proc(executables[i], p);
        p->state = RUNNABLE;
    }
    // [...]
}
This is one of the few places in the course where we actually establish a convention for your kernel’s design, primarily to simplify debugging. Please respect our convention; it will help you.
Task: First, change your ELF loader so that the caller specifies where the program goes, either by passing the destination base address, or by passing the struct proc* and letting the loader compute PROC_START + p->pid * PROC_SIZE. Either is fine; we suggest passing the struct proc*, since in Quest 2 the loader will need to fill in more fields of the descriptor anyway. You will also need to pass a (hardcoded) name for the process, so that you can print it in the process table.
Second, then rewrite your init function and the surrounding code (e.g., in kernel/init.c) to use the executables and executable_names arrays described above. If you run make and get a warning along the lines of:
warning: 'executables' symbol not found in kernel ELF. Make sure the executables array is a global variable.
GDB user-space symbol loading will not be available.
then you have not followed the convention and your kernel will be harder to debug (and may fail our autograder).
Third, have your kernel create and load three kernel processes:
user/hello.elfuser/counter.elfuser/primecheck.elf
For each one: call the function you defined earlier to allocate a process descriptor, record a name in the descriptor, load the ELF into that kernel process’s region, and mark the process RUNNABLE.
Finally, after kernel_main calls init(), print the process table, and then start one kernel process the way you did in Project 1—by casting its entry point to a function pointer and calling it. (In Quest 2 you’ll replace that with a real context restore.) Start primecheck, because it is the one program of the three that does not call yield(), which does not exist yet.
Hints
- The linker gives you a symbol for each embedded executable, exactly as in Project 1:
_binary_user_hello_elf_startand friends.kernel/init.calready has theexterndeclarations. - The user programs are compiled as position-independent executables (
-fPIC -pie) and linked withuser/procs.ld, which places their segments starting at virtual address 0. That is why “load atslot_base + p_vaddr” works, and why the entry point in the ELF header is an offset that you must addslot_baseto before you can call it. - Print the process table as soon as you can: PID, name, load address, entry point, state. You will read this output dozens of times over the next three quests, so make it easy to read.
- Build up in small steps: get one kernel process loaded through the new interface and running (identical behavior to Project 1) before you load three.
🤖 AI use/coding: auxiliary use allowed. You may use AI to help adapt the loader’s interface and to debug address arithmetic. You may not hand it this task wholesale.
Why? Project 1 let you use AI freely for the ELF loader itself, because the ELF format is not a learning goal of this course, and that still holds for the parsing code. But the change you are making now is not about ELF—it is about the kernel deciding where in physical memory each process lives, which is very much a learning goal.
For context, see the principles around AI use in CS 1670.
Check your work
Run make qemu. You should see your kernel start, list three loaded kernel processes at three different addresses, and then run one of them:
Hello world from MyOS!

Process table:
pid 0  "hello"       load 0x000A0000  entry 0x000A0000  RUNNABLE
pid 1  "counter"     load 0x000B0000  entry 0x000B0000  RUNNABLE
pid 2  "primecheck"  load 0x000C0000  entry 0x000C0000  RUNNABLE

starting pid 2 (primecheck)...
Process primecheck: Found another 1000 primes; last one was 7919!
Process primecheck: Found another 1000 primes; last one was 17389!
...
Two things worth verifying in gdb, because they will save you time later:
- All three programs really are in memory, at the right places. Break after loading the ELF executables and disassemble at each kernel process’s entry point:
x/8i 0xA0000,x/8i 0xB0000,x/8i 0xC0000. You should see three plausible-looking sequences of assembly instructions, not zeroes. - You are at EL1.
p/x $cpsrand check that the low four bits are0x5(EL1h).
Where’s the multiprocessing and concurrency? There isn’t any yet, and that is the point of stopping here. Notice precisely what changed: Project 1 loaded one program at a time into the same place; your OS now holds three programs at once, in three places, and knows about all of them. That is the memory-layout and bookkeeping prerequisite for everything that follows. The next quest builds the machinery to actually move between them.
Quest 2: Saving and restoring a context
Files: kernel/constant.h, kernel/context.S, kernel/context.h, kernel/proc.h, kernel/elf.c, kernel/kernel.c.
Overview
The notion of a context switch is the heart of the project and creates the magic that lets a computer run one process, then run another for a while, and continue the first process as if nothing had happened. You will define what a saved context looks like in memory, write the two functions that save and restore one, and then use the restore half to start a process. This makes for a satisfying way to test your work, because starting a process from nothing is just restoring a context you made up.
Why are we doing this?
Every operating system on every architecture contains a function like the one you are about to write, and it is always in assembly, because it is the one piece of a kernel that manipulates the very registers a compiler assumes it owns. You cannot write it in C: the moment you have loaded another process’s registers, the C compiler’s assumptions about what is in them are false, and there is no way to express “and now change the program counter too” in C at all.
This is also where the abstract idea of “a process” becomes 272 concrete bytes that you can look at in a debugger!
Background: what is a “context”?
Here is the central question of this project. A program is running on the CPU. You want to stop it, run a different program for a while, and later resume the first one so that it cannot tell anything happened. What exactly do you have to save?
Think about what “a running program” consists of, from the CPU’s point of view (the register names here are specific to the ARM64 architecture, but the concepts generalize):
- The general-purpose registers (
x0–x30). These hold the program’s live values: loop counters, pointers, intermediate results, its frame (base) pointer inx29, and its return address inx30. Lose one and the program computes garbage. - The stack pointer (
sp). The program’s locals, saved registers, and return addresses live on its stack. Losespand the program’s entire call chain is gone. - The program counter (
pc)—the address of the next instruction to run. Lose or corruptpcand the program will try to execute the wrong code or even random memory. - The processor state (
PSTATE): the condition flags (N/Z/C/V) that a following conditional branch depends on, the current exception level, which stack pointer is in use, and which interrupts are masked. This is similar to the%rflagsregister on x86-64 that you learned about in the assembly unit of CS 300.
That list, saved somewhere in memory, is a context. Colloquially, saving it is “taking the process off the CPU”; loading it back is “putting the process on the CPU”. Doing both, one after the other, for two different processes, is a context switch.
Two of these are tricky to handle, and ARM64 has a specific answer for each:
- You cannot just save and restore
pc(the program counter). There is no instruction that writespcdirectly. Instead, ARM64 gives you theeret(“exception return”) instruction, which setspcfrom theELR_EL1system register (the Exception Link Register) andPSTATEfromSPSR_EL1(the Saved Program Status Register) both at once, in one instruction. This is exactly what you need: restoring a program counter and a processor state separately is impossible to do safely, because after you set one you are already running with the wrong version of the other. - You cannot save
PSTATEfield by field either. The place to storePSTATEis theSPSR_EL1machine register, anderetis the only way to setPSTATE.eretat EL1 will take the value forPSTATEfromSPSR_EL1, so that is where you must restore it to.
So a saved context in your OS will be: the 31 general-purpose registers, plus ELR_EL1 (where to resume) and SPSR_EL1 (what state to resume in). We will handle the stack pointer with a trick you’ll meet in a moment.
We have to store the saved registers somewhere. There are two obvious choices, and the one we recommend you choose is less obvious but much nicer:
- Inside the process descriptor.
struct procgets astruct contextfield, andsave_contextwrites the registers into it. Straightforward, but it means the stack pointer must be saved and restored explicitly, and it does not generalize well to interrupts. - On the process’s own stack. Just before saving, you subtract the size of a context from
spto make room, and then write the registers into that space.struct procstores only a pointer to it.
We recommend the second. Here is what this looks like:

The trick that makes it elegant is that the saved context always sits immediately to the left (i.e., at lower addresses) than the stack pointer the process had, so you never need to save sp at all, because you can compute it. Restoring is:
sp = (address of the saved context) + (size of a context)In other words, the context’s own location in memory helps you determine where the stack pointer was, since that location must be one context’s worth beyond the address where the context was saved on the stack. This also provides the right structure for interrupt handling, where the hardware has already switched to the process’s stack by the time your code runs (as you’ll see in Quest 4).
Wait—doesn't this mean the kernel runs on the process's stack?
Yes! This is a different from WeensyOS in CS 300 and your early bootup code, which use a single, separate kernel stack. After this assignment, you’ll have multiple active kernel processes at the same time, each with their own stack. But since your OS doesn’t have a userspace/kernel separation or system calls yet, these processes all call into kernel code as if it was just a library. For example, when a process calls printf(), the kernel code that runs (your printf implementation) executes on that process’s stack. (By contrast, a design with a single kernel stack would switch sp to that stack every time you call a function in the kernel, and switch it back when you return.)
We use this design because with interrupts, a kernel process can be interrupted while it is in the middle of a kernel function, so multiple kernel processes can be running kernel code concurrently! This is why a single kernel stack no longer works: if two processes were running kernel code atop the same kernel stack, they would overwrite each other’s stack frames.
This has the consequence that your kernel code must not use much stack, because it is spending someone else’s stack space. A printf with a 1 KiB buffer in a 64 KiB process region is fine, but a deeply recursive kernel function might not be.
A real kernel gives each process a separate kernel stack precisely so that user-mode and kernel-mode execution don’t share one. You will add that in Project 4, when processes move to EL0 and the distinction starts to matter.
So how do we store the context in memory? The answer is: however you like, there is no single right way as long as save_context and restore_context agree. You must include all of the information mentioned above, though! In addition, the ARM64 architecture requires the start and end of the stored context to be aligned with a 16-byte boundary. Think about this on your own a bit and come up with a memory layout and matching struct definition. If you’re stuck or are looking for inspiration, we provide a recommended example layout below.
Recommended layout
The layout of a context
You can lay out the context in memory however you like, but it must be consistent between save_context and restore_context. Here is the layout we recommend, and which the rest of this handout assumes. It holds 34 64-bit values, for a total of 272 bytes:

| Offset | Contents |
|---|---|
0 | x29 (fp, the frame/base pointer) |
8 | x30 (lr, the link register, which holds the current function’s return address) |
16 + 8*k | xk, for k = 0 … 28 (so x0 at 16, x28 at 240) |
248 | ELR_EL1 — where to resume |
256 | SPSR_EL1 — what processor state to resume in |
Some notes on the odd bits of this particular proposal:
- Why are
fpandlrfirst, and separate from the others? The strategy for context saving that we recommend involves calling into asave_contextfunction. But the function call intosave_contextitself overwriteslr(the ARM64 register holding the return address) with its own return address—so by the timesave_contextstarts running, the value oflryou wanted to save is already gone. The caller must therefore savefpandlrbefore thebl, and putting them at offsets 0 and 8 lets the caller do that with a single assembly instruction (stp fp, lr, [sp]). - Why 34 values, I only count 33? The reason is alignment.
spmust be 16-byte aligned on ARM64, and 33 words (264) is not a multiple of 16 bytes. It also turns out we’ll use the extra eight bytes when we implement syscalls in Project 4, so we might as well reserve it now. - Why no
sp? See above: the value ofspis implied by where the context is saved on the stack.
You are welcome to try different layouts if they make more sense to you: there is no single correct layout. However, you will need to capture at least the information included in the above context for your context switches to work correctly in the end.
What you need to do
Part A: define the context
In the first step, we will define a data structure to represent a saved context in C. This data structure must have exactly the memory layout you choose for your context (e.g., the one we suggest above). It must also be 16-byte aligned, because it will be stored on the stack and sp must always be 16-byte aligned on ARM64.
Task: Define a context_t type matching the layout above (e.g., in kernel/proc.h). Add a context_t* field to struct proc to hold the process’s saved context.
🤖 AI use/coding: auxiliary use allowed. Feel free to ask AI about C struct layout and whether your struct represents the above.
Why? There little to be gained by making you rediscover C’s struct layout rules, but you should understand exactly why this struct has the shape it does, because you are about to write assembly that depends on every offset in it.
For context, see the principles around AI use in CS 1670.
A helpful tip to avoid future bugs
Because the assembly needs the size of a saved context to be written as a literal number while the C code needs it as a sizeof, the two can drift apart. If they do, you get a bug that will cost you a day because the your context switches will break! The standard defense against this risk is a compile-time assertion:
_Static_assert(sizeof(context_t) == S_FRAME_SIZE, "context_t must be S_FRAME_SIZE");with S_FRAME_SIZE defined in a header (kernel/constant.h) that both the C and the assembly can #include. Kernels are full of tricks like this that protect developers from themselves because the alternative is silent memory corruption.
Part B: save_context and restore_context
Now we will write the assembly code for the actual context switch. This is the heart of this project and where all the magic comes from! You’ll write two functions, save_context and restore_context in assembly. We recommend putting both functions into kernel/context.S.
Why must these functions be written in assembly?
You can’t write the context switch functions in C because the compiler assumes that it can use general-purpose registers for temporary storage when it generates the assembly code for a C function. But you’re trying to save the precisely the values in these registers! If you wrote save_context in C, the compiler would generate code that clobbers the registers you are trying to save. Similarly, if you wrote restore_context in C, the compiler would generate code that clobbers the registers you are trying to restore. The only way to avoid this is to write these functions in assembly, where you have complete control over which registers are used and when.
Bootup and context switch code are parts of an OS kernel that are nearly always written in assembly.
Writing this code is tricky. The assembly itself is mechanical, but you must think carefully about the state of the CPU, the order of operations, and the invariants you must maintain. One important complexity is that calling a function itself changes the state of the CPU registers (e.g., the return address in lr/x30, the stack pointer in sp, and the values of registers that hold arguments).
There are several canonical ways you can write this code. The main ones are:
- Use an assembly macro. Rather than writing callable functions
save_contextandrestore_context, you can write an assembly macro that expands to the code for saving or restoring a context inside the functions that need to do so. This avoids the problem of clobbering registers when calling a function, but it can make the code harder to read and maintain. If you want to use this approach, you will need to learn about ARM64 assembly macros. - Split
save_contextinto two parts. You can first save the registers that will be clobbered by a function call inside the function that callssave_context, and then save the rest of the context insidesave_context, which you call as a normal function (e.g., via theblassembly instruction). There are only a handful of places in the kernel that callsave_context, so this is a reasonable approach. This is the approach we recommend.
In the following, we describe the contracts for the two functions, with notes for how save_context differs if you follow the second (recommended) approach.
save_context takes no arguments in the ordinary sense, since its job is to faithfully store the exact CPU state at the moment it happens. Here’s what it needs to do:
- subtract a context’s worth of bytes (
S_FRAME_SIZEor 272) fromsp, making room for the context on the stack; - store registers
x0–x30into the right offsets inside this space; - copy
ELR_EL1, andSPSR_EL1into the right places inside this space to storepcandPSTATEvalues; - set
ELR_EL1andSPSR_EL1to the values that should be saved (in Quest 4 the hardware will have done this part) and return normally.
If you are following our recommended approach (2) above, you should assume that by convention, the caller of save_context has already:
- subtracted
S_FRAME_SIZEor 272 fromsp, making room for the context; - stored
fpandlr(atsp + 0andsp + 8if following our recommended layout); - set
ELR_EL1andSPSR_EL1to the values that should be saved (again, in Quest 4 the hardware will have done this part).
save_context then merely stores x0–x28, copies ELR_EL1, and SPSR_EL1, and returns normally.
restore_context(context_t* c) takes a pointer to a saved context in x0, and never returns. It must:
- Write the saved
ELR_EL1, andSPSR_EL1back into their system registers. - Restore
fp,lr, andx0–x28from the saved context. - Set
sptoc + S_FRAME_SIZEorc + 272, popping the context from the stack. eret, which setspcfromELR_EL1andPSTATEfromSPSR_EL1in a single step.
Task: Write save_context and restore_context. We recommend putting these into kernel/context.S.
We also recommend declaring restore_context in kernel/context.h, as it will need to be called from C. Declare it as [[noreturn]] void restore_context(context_t* c);. The compiler will then know that code after a call to it is unreachable, which both improves the generated code and catches mistakes.
Hints (read these; several are non-obvious)
- Use the ARM64 assembly reference. Appendix A of this project and the reference in Appendix A of Project 1 are both very helpful for writing this code.
stpandldpare your friends.stp x0, x1, [sp, #16]stores two registers at once, at offsets 16 and 24. Using them halves the number of instructions and makes the offsets easy to keep straight:stp x0, x1, [sp, #16*1],stp x2, x3, [sp, #16*2], and so on. Note thatx28is the odd one out and needs a plainstrinstruction if you’re handlingx29andx30separately.- In
restore_context, restorex0last.x0holds the pointer to the context you are reading from. If you restore it early, the rest of your loads read from wherever the process happened to have leftx0. This is a wonderfully confusing bug, so: loadx0(andx1, if you useldp) at the very end. - You need a scratch register for the system registers, because
msrcannot take a memory operand: load the saved value into a general register first, thenmsrit. The invariant to hold onto is that all of your scratch-register work—the three system registers andsp—must be finished before you start restoring general-purpose registers, because from that moment on every register belongs to the process again. Do the system registers first, thensp, then the general registers. save_contextis only ever called from assembly. There is no need to declare it in a C header, and it deliberately does not follow the normal C calling convention.- Build this incrementally. You can write
restore_contextfirst and test it in Part C;save_contexthas nothing to save until Quest 3. - If you want to sanity-check your offsets, write the context from C in a test, then dump memory in
gdband confirm each register landed where you expect.
🤖 AI coding: NOT allowed. Do not generate this code with AI, and do not paste our specification into a chatbot and ask for the assembly.
Why? This is the single most important piece of code in the project, and it is the thing we will ask you to walk through and modify in your whiteboard discussion. It is also only about 60 lines of extremely mechanical assembly—there is no productivity argument for generating it, and there is a large learning cost to not writing it. As always, you are welcome to ask AI what stp does or how eret differs from ret.
For context, see the principles around AI use in CS 1670.
Part C: build an initial context, and start a kernel process with it
A process that has never run has no saved context—so the kernel has to fabricate one that looks exactly like a context saved from a process about to execute its first instruction. This is a lovely idea: to start a program, you construct a lie about its past and then resume it.
The initial context for a newly loaded process needs:
- Location: immediately prior (in address terms) to the top of the process’s stack, i.e. at
stack_top - sizeof(context_t). Restoring it will therefore setsptostack_top, which is exactly right for a program that has not pushed anything yet. - All general-purpose registers: zero. A fresh program has no live values. Zero the whole frame first and then fill in what matters; this also means a stray read of an uninitialized register gives you a predictable 0 rather than junk.
ELR_EL1: the program’s entry point, which is the ELF header’se_entryplus the base address you loaded the process at. Recall thatELR_EL1is whereeretwill jump to (normally a saved return address, but here the first instruction of the program).SPSR_EL1: the processor state the process should run with. For now: EL1 usingSP_EL1(EL1h), with all interrupts masked—you still have no interrupt handlers. We define this as a named constant,SPSR_PROC, inkernel/aarch64.h, composed from theSPSR_EL1handSPSR_MASK_ALLconstants in the same file. Use this constant for now; you will change it in Quest 4.
Task: In your ELF loader (or in a helper next to it), build each newly loaded kernel process’s initial context and store a pointer to it in the process descriptor.
Then change the kernel_main function so that, instead of calling an executable’s entry point as a function pointer, it starts the first kernel process by setting current_process (the global pointer to the active process that you created in Part A), marks the kernel process as RUNNING, and calls restore_context(current_process->context). In other words, you are replacing the function pointer cast and invocation with setting up an initial context and then restoring it to run the process.
Hints
memzero(from Project 1’skernel/mm.S) will zero the memory for the context for you.- Keep the kernel process you start as
primecheckfor now:helloandcountercallyield(), which does not exist until Quest 3. kernel_mainwill never return once you do this—the kernel’s own initial stack atINITIAL_KERNEL_STACKis abandoned the momentspmoves to the process’s stack. That is expected and fine, and declaringrestore_contextas[[noreturn]]documents it.- If the machine hangs or resets instantly, the most likely culprits are:
ELR_EL1being off (so you jumped into nothing),SPSR_EL1not holding a validEL1hvalue (which causes an illegal exception return), or a context that is not 16-byte aligned.
🤖 AI use/coding: auxiliary use allowed. You may use AI to help you reason about what a fabricated initial context has to contain, and to debug it.
Why? The idea that to start a process, you construct the context of a process that is about to start and pretend to return to it, is one of the neat conceptual moves in kernel design, and talking it through with a friend, a TA (or AI) is a good way to internalize it. But write the code yourself, as it is only a dozen lines and every one of them matters. You’ll get some genuine satisfaction when this move starts working!
For context, see the principles around AI use in CS 1670.
Check your work
make qemu should behave exactly as it did at the end of Quest 1: primecheck runs and prints primes. That is the point: the observable behavior is unchanged, but the mechanism underneath is completely different. Rather than calling your program as a function, your process is now running because your kernel built a context and restored it!
Verify that in gdb, because “I did nothing”, “it happens to work”, and “it actually works” can look identical here. Here’s a receipe for checking with GDB:
(gdb) break restore_context
(gdb) continue
(gdb) p/x $x0                 # the context pointer: should be stack_top - 272
(gdb) x/34gx $x0              # the stored context itself: mostly zeroes, then entry point, then SPSR
(gdb) # step to just past the `eret`, then:
(gdb) p/x $pc                 # should be the process's entry point
(gdb) p/x $sp                 # should be the top of the process's stack
(gdb) p/x $cpsr               # low nibble should be 0x5 (EL1h)
Optional but recommended: if you would like real error messages while debugging Quests 2 and 3, you can do Quest 4, Part A (the exception vector table and a synchronous-exception handler) early. It takes about half an hour and turns “the machine hung” into “unhandled exception, ESR=…, ELR=…”, which is worth a great deal when you are debugging a context switch.
Quest 3: Cooperative concurrency
Files: kernel/memlayout.h, user/u_common.h, kernel/context.S, kernel/scheduling.c, kernel/scheduling.h, kernel/kernel.c.
Overview
Now you make your OS actually switch between kernel processes that exist in memory at the same time. In this quest you will expose a yield() function to user programs, implement it, write a round-robin scheduler, and watch three kernel processes take turns. You will also watch what happens when one of them refuses to take turns—which is the motivation for Quest 4.
Why are we doing this?
Cooperative concurrency is the simplest possible answer to “how does the kernel get the CPU back”. By the end of this quest you will have a working multitasking OS, akin to early versions of Mac OS or Windows.
Background: how a process reaches the kernel, and how it gets back
Recall from Project 1 how your programs call printf: because they are compiled separately from your kernel, they cannot link against it, so the kernel writes the address of its vprintf into an agreed-upon memory location (F_VPRINTF), and the user side calls through that pointer. yield() will use exactly the same mechanism, with a new slot F_YIELD.
A call to yield() from a process is an ordinary function call, as the kernel process is at EL1 and so is the kernel. This is convenient and it is also temporary: in Project 4, processes will run at EL0 and yield will become a real system call.
And what about getting back? When the scheduler eventually picks this process again and calls restore_context on the context you just saved, the eret sets pc to the saved ELR_EL1—which is the return address of the yield_entry call—and sp to just above the frame. The process resumes at the instruction after its call to yield(), with every register as it left it. From the process’s point of view, yield() was a function call that took a suspiciously long time.
What you need to do
Part A: expose yield to user programs
Task: Wire up the trampoline for yield (see the background above), and check that a process can call it and come back.
- Add an
F_YIELDslot next toF_VPRINTFin the set of kernel functions exposed to processes. We recommend following the existing convention: use the next pointer-sized slot at decreasing addresses fromF_BASE. - Add a process-side wrapper for
yield()touser/u_common.h, alongside the existingprintf, that calls through that address. Then uncomment theyield()call inuser/hello.cand inuser/counter.c: we provide those two programs with theiryield()calls commented out, because until now there was noyield()for them to call and we wanted to avoid compiler errors. - Now implement a kernel function to handle
yieldcalls (e.g., inscheduling.c). For this step only, make your yield implementation a placeholder that does nothing:void yield_entry(void) { }in C. - In
kernel_main, store the address of your kernel-sideyield_entryimplementation intoF_YIELD, next to where you storevprintf. - Then switch the process you start in
kernel_maintohello, and confirm you see it loop when running your OS.
Hints
user/u_klib.his generated byuser/gen_klib_header.py, which scrapes every#define F_...line out ofkernel/memlayout.h. So addingF_YIELDtomemlayout.hautomatically makes it available to user programs—you do not need to editu_klib.h(and should not; it is regenerated on every build).- The process-side wrapper is a one-liner in the same style as the existing
printfone. Getting the function-pointer cast right is the only fiddly part. - Step 5 exists to separate two failures. If
helloprintsbefore yieldandafter yieldrepeatedly, your trampoline works and you can go implement the real thing. If it printsbefore yieldonce and then hangs or dies, your trampoline is broken—and you have learned that before adding a scheduler on top of it.
🤖 AI use/coding: allowed, including agentic coding. You can generate this code, which mirrors what you built for printf in Project 1, with AI or use an agent to implement this task. See below for some important and helpful hints on how to do so effectively.
Why? This is the same mechanism you already built in Project 1, so there is little new learning in the plumbing itself. But you must understand what the mechanism is—an agreed-upon address holding a function pointer—because it is a stripped-down stand-in for the system call interface you’ll build in Project 4.
For context, see the principles around AI use in CS 1670.
Helpful hints for effective AI use
This task touches several files and makes changes to achieve an intermediate goal. You will get the best results if you clearly explain to your AI agent what you want to do, and then ask it to generate the code for each file separately (or use an agent that can modify multiple files). For example, you might say:
“I want to add a new kernel function
yield_entrythat user programs can call.1. Add a new
#define F_YIELDinkernel/memlayout.hnext toF_VPRINTF.2. Add a wrapper for
yield()inuser/u_common.hthat calls through theF_YIELDpointer.3. Implement a placeholder
yield_entryinkernel/scheduling.cthat does nothing.”
… or similar. But it’s important to break down the steps for the AI or agent, rather than telling it something like “add a yield function to the kernel” or “implement cooperative concurrency” because such vague prompts might lead to the AI overshooting the mark. It might implement too much code, making it difficult for you to test your work against our expectations, or it might implement code that is incompatible with what you’ll do next. Even if it implemented everything correctly, it would deprive you of important learning that comes with the next part of this quest.
Part B: actual yielding and the scheduler
Now we’ll implement the actual scheduler. A scheduler consists of a policy, which will be the easy part here, and some mechanism, which is where the context switch you learned about in this project comes into play.
Background: scheduling mechanism and policy
It is worth separating two things that are easy to confuse:
- The mechanism is how you switch: saving registers, loading registers,
eret. This is intricate, architecture-specific assembly, and it is the same no matter which process you pick next. - The policy is which process you pick next. This is ordinary C code—often a surprisingly short loop—and it is where all the interesting design questions live.
Your policy in this quest will be round-robin: keep the processes in a list, and each time you need to pick one, take the next runnable one after the process that just ran. Round-robin is simple, and fair in a crude sense: every process gets one chance to run before any process gets a second chance. (This isn’t what literature on scheduling calls “fairness”, though, as a process that is stuck waiting for I/O will lose its turn. If you’re in 1690, you’ll look at this in Quest 5.)
For the mechanism (“plumbing”) part, we will use the save_context and restore_context logic that you developed in Quest 2 to implement real yielding.
Look again at what restore_context needs: ELR_EL1 (where to resume) and SPSR_EL1 (what state to resume in). These registers are typically set by the hardware for you when an exception, interrupt, or system call happens. But on an ordinary function call, nobody does this for you: ELR_EL1 and SPSR_EL1 contain whatever they last contained, which is garbage.
The answer is for yield to do the hardware’s job by hand. Here is what an ARM64 CPU does when it takes an exception to EL1, and what your yield will do in imitation:
| The hardware, on an exception | Your yield, on an ordinary call |
|---|---|
Masks interrupts (PSTATE.I ← 1) so the handler isn’t interrupted | msr DAIFSET, #2 |
Copies the return address into ELR_EL1 | msr ELR_EL1, x30 (x30 = lr = the return address) |
Copies PSTATE into SPSR_EL1 | msr SPSR_EL1, <SPSR_PROC> |
| Jumps to the appropriate exception vector | …you are already in the handler |
That is why yield needs a small assembly stub of its own, which we’ll call yield_entry. Once those first three steps have run, the situation is identical to an exception entry, and the rest of the code—save_context, the scheduler, restore_context—can be written once and used by both paths. In Quest 4, you will write the interrupt entry point and it will be the same stub with those first three steps deleted, because there the hardware really did do them.
Here is the shape of this assembly stub, which is often called a “trampoline”, since it bounces the process into the yield handler, handle_yield:
// void yield_entry(void)
// Called by a process as an ordinary function (through F_YIELD).
    .globl yield_entry
yield_entry:
    msr  DAIFSET, #2            // 1. mask IRQs: the kernel runs uninterruptibly
    msr  ELR_EL1, x30           // 2. resume address = our return address
    mov  x9, #SPSR_PROC         // 3. processor state to resume the process with
    msr  SPSR_EL1, x9           //    (uses x9 as a scratch register; see below)
    sub  sp, sp, #S_FRAME_SIZE  // 4. make room for the context on the stack
    stp  fp, lr, [sp]           // 5. save fp/lr now: `bl` is about to clobber lr
    bl   save_context           // 6. save everything else
    mov  x0, sp                 // 7. arg0 = pointer to the saved context
    bl   handle_yield           //    ...and into C, never to return
    b    .                      //    (should be unreachable)
This code will replace your no-op yield_entry placeholder from Part A.
Two details in this code that are worth understanding
Why is it OK to clobber x9 before saving it? Because yield_entry is called as a normal C function, and the ARM64 calling convention says a function may freely destroy x0–x18. The compiler that generated the process’s code knows this and will not have anything live in x9 across the call. We save x9 anyway because saving all 31 registers is simpler than reasoning about which ones matter, but the value we save is the scratch value. If you want to learn more and optimize your context switch code to only store what’s strictly necessary, ask your favorite AI a question like “Please explain the ARM64 C calling convention to me”—you’ll find that x9–x15 are caller-saved temporaries that live on the stack (and which the caller must save), while x19–x28 are callee-saved registers that a callee must save before using and restore before returning.
Why must the kernel run with interrupts masked? Technically, this isn’t required yet, as we have yet to enable any interrupts in our OS. But the code exists to protect against a problem that can occur once we do: think about what would happen if a timer interrupt arrived after step 5 but before the scheduler finished. The interrupt handler would allocate another context frame on the same stack, overwrite current_process->context with a pointer to it, and reschedule—leaving the half-finished yield stranded. If that happened a few thousand times, the process’s stack may grow too large and overwrite the code/data segments. A context switch must be atomic with respect to interrupts, and masking them is how you get that. Ensuring that certain important operations are atomic is one of the major challenges of kernel design.
To pull everything together, you’ll add a simple scheduling policy, round-robin scheduling, and set up the mechanism. While you can do this in a number of ways, we recommend using four pieces and putting them into kernel/scheduling.c (declared in kernel/scheduling.h):
pick_next(), which implements the policy. Return the nextRUNNABLEprocess in the table aftercurrent_process, wrapping around. If nothing is runnable,panic(): with no way to block and no idle process, that means something has gone wrong. (Your processes never terminate in this project, so this should never fire; apanichere will catch bugs elsewhere.)resume(struct proc* p), which puts processpon the CPU. Make itcurrent_process, mark itRUNNING, andrestore_context(p->context). This function never returns.scheduler(), which simply callsresume(pick_next())and never returns. Keeping this separate frompick_nextis what keeps your policy and your mechanism from getting tangled up. This will be helpful if you’re in CS 1690 and complete Quest 5.yield()(an internal kernel function of this name, distinct fromyieldinu_common.h), which markscurrent_processasRUNNABLE(it is not running any more, but it is still ready to run) and callscheduler(). This function also never returns.
Plus the entry point that ties them together:
handle_yield(context_t* ctx), which is called from youryield_entryassembly code with a pointer to the just-saved context. Record that pointer incurrent_process->context, then callyield(). Like most of the other functions, this never returns because it switches to a different process.
Why so many “never returns”? This is a specific oddity of scheduler code in an OS kernel. Because from the moment a process’s context is saved, the only way execution ever continues in that process is through a restore_context: there is no “return” path back up the call chain. Marking these functions [[noreturn]] lets the compiler check that you have not accidentally written code that assumes otherwise, and it documents the control flow for the next person to read it (which is you, in future assignments). If one of them does return, that is a bug and you should panic().
Task: Replace your placeholder with the real thing.
- Write the
yield_entryassembly stub inkernel/context.S, and pointF_YIELDat it. - Implement a scheduler with the round-robin policy and a mechanism as outlined above (e.g., using
handle_yield,yield,scheduler,resume, andpick_nextinkernel/scheduling.c). - Change
kernel_mainto start process 0.
Hints
- Test with two processes before you test with three.
helloandcounteralone produce output that you can predict exactly, and predicting the output before you run it is the fastest way to find out whether you understand your own scheduler. - Watch out for the state transitions. A process must be
RUNNABLE(notRUNNING) when the scheduler looks at it, or a round-robin scan will skip it forever. It is worth adding a check inpick_nextthatcurrent_process->state != RUNNINGwhen it is called, as doing so catches a family of bugs where you forgot to update state. - If the first switch works and the second hangs, suspect
save_context: the first switch only exercisesrestore_contexton a context you built, while the second exercises one thatsave_contextproduced. - If a process resumes but immediately misbehaves, dump its context frame before and after the switch and compare. To do so, you can use
x/34gx <context pointer>ingdb.
🤖 AI coding: NOT allowed for yield_entry, handle_yield, and yield. Auxiliary use allowed for pick_next, scheduler, and resume.
Why? The split follows the learning goals. How a process gets into the kernel, has its context saved, and is later resumed as if nothing happened is precisely what you are supposed to walk out of this project understanding. We may ask you to explain and modify it in your whiteboard discussion. Round-robin selection, by contrast, is a five-line loop over an array, so the main challenge with it is to get the C code right, which AI can help you with.
For context, see the principles around AI use in CS 1670.
Check your work
With two processes (hello as PID 0, counter as PID 1), the output is completely determined, and you should be able to predict it. hello prints, yields; counter prints, yields; hello resumes where it left off:
Process hello: before yield
Process counter: 0
Process hello: after yield
Process hello: before yield
Process counter: 1
Process hello: after yield
Process hello: before yield
Process counter: 2
...
Trace through your scheduler on paper and check that this is what you expect. If your output has the right lines in the wrong order, your scheduler works but your understanding of it is incorrect.
Then add primecheck back as PID 2 and run all three.
Task: Run your OS with all three processes and observe what happens.
Then make sure to create a Git commit that captures your work on cooperative concurrency, so that we (and you) can review it. You will change this code in Quest 4, so make a commit now and push it to your repository.
What you should see is that hello and counter each get one turn, and then everything stops except primecheck:
Process hello: before yield
Process counter: 0
Process primecheck: Found another 1000 primes; last one was 7919!
Process primecheck: Found another 1000 primes; last one was 17389!
Process primecheck: Found another 1000 primes; last one was 27449!
...forever...
The reason is that primecheck never calls yield(). It is not malicious, though: it is just a program doing a long computation (finding all primes), which is a completely reasonable thing for a program to do. (Of course, this sort of thing can be hard to distinguish by observation from a buggy or malicious program: e.g., Eve from CS 300 mining Bitcoin is also a “long computation”). But this long computation has completely crowded out the other two processes, and even your OS kernel no longer gets to run! Every other process is RUNNABLE, but never runs, and it will stay that way until the machine is switched off.
This is the flaw in cooperative concurrency, and no amount of cleverness in your scheduler can fix it: your scheduler is not running. You cannot schedule if you cannot get the CPU back. If you recall the Alice/Eve examples from CS 300, you’ll see a similarity here and might guess at the answer (timer interrupts). This is what the next quest is about.
Bonus Quests (Extra Credit)
Important note: All extra credit work requires you to meet with an instructor at office hours to discuss your work in order to get credit. There will be no exceptions to this, since extra credit is strictly optional.
Quest 3-E: Let processes finish (easy–moderate difficulty)
Your processes can never terminate. hello and counter loop forever; and if a program did return from main, it would return to whatever address was in lr—which, in the initial context you built, is zero. The program would jump to address 0 and the machine would crash.
Normally, telling the kernel “I am done” requires a system call, which you will build in Project 4. But your processes run at EL1, at the same privilege as your kernel, which means there is a shortcut available to you right now by returning into a kernel-provided cleanup function.
Task (extra credit): Give processes a way to terminate. Set a newly created process’s initial lr to the address of a kernel function—proc_exit, say—so that returning from main lands in the kernel, which can then mark the process UNUSED and reschedule. Demonstrate it with a program that computes something and then returns. Make sure to keep at least one process that doesn’t return and exit, though, as your scheduler currently panics when there are no runnable processes.
Now consider why this trick will stop working in Project 4, when processes run at EL0? We’ll discuss this when you meet with an instructor.
🤖 AI use/coding: allowed, including agentic coding. We generally allow AI for extra credit quests, but you must understand your implementation fully. To get credit, you will need to discuss your work with an instructor in person.
Quest 4: Preemptive concurrency
Files: kernel/exceptions.S, kernel/exceptions.h, kernel/interrupts.c, kernel/interrupts.h, kernel/drivers/timer.c, kernel/drivers/timer.h, kernel/aarch64.h, kernel/kernel.c, kernel/printf.c.
This quest depends on the lecture material on exceptions, interrupts, and preemption. Wait for that lecture; the hardware behavior involved is not something you can reasonably reverse-engineer from a handout.
Overview
We will now address the starvation problem with cooperative concurrency. To do so, you will make the CPU interrupt your processes on a schedule. This requires four new components:
- An exception vector table, so that the CPU knows where to jump when anything exceptional happens, and a handler for synchronous exceptions including timer interrupts (which also gives you real error messages for kernel bugs).
- A timer device driver, so that the hardware generates an interrupt at regular intervals.
- Interrupt routing and dispatch, so that the timer’s interrupt actually reaches your CPU and your code figures out where it came from.
- The connection to the scheduler: on a timer interrupt, preempt the running process.
Why are we doing this?
Preemption is the difference between an OS that depends on the goodwill of every program and an OS that is actually in charge. It is also the point at which you have to understand what the CPU does when it is interrupted, which is one of the genuinely essential pieces of knowledge in systems programming: it underlies system calls, page faults, device I/O, debuggers, profilers, and the reason your laptop doesn’t freeze when a program has a bug.
Background: exceptions and interrupts
ARM64 uses the word exception for anything that makes the CPU stop what it is doing and jump to a handler. There are two fundamentally different kinds, and the distinction matters:
Synchronous exceptions are caused by the instruction being executed, and they happen at a well-defined point in the instruction stream: this instruction, right here, could not be completed. Examples of synchronous exceptions include: a memory access to an address with no valid translation (a page fault), an undefined instruction, a division-related fault, or a deliberate
svcinstruction (a system call). Because they are caused by an instruction, they are reproducible: if you run the same code with the same state, you get the same exception at the same place.Interrupts are caused by something outside the CPU and have nothing to do with which instruction happens to be executing. For example, this occurs when a timer expires, a network card receives a packet, or the user presses a key. ARM64 calls these asynchronous exceptions, which is the more precise name: they arrive whenever they arrive, and the instruction they land between is arbitrary. ARM64 has two interrupt types, IRQ (ordinary) and FIQ (“fast” interrupts). We will use only IRQ-type interrupts. There is also SError (System Error), for asynchronous hardware faults, which we will not handle.
What’s the difference? Practically, a synchronous exception is about your code, while an interrupt merely interrupts your code. When a synchronous exception happens, it is related to the running process and the kernel usually wants to fix something up and retry, or kill the offending process. When an interrupt happens, by contrast, it is potentially (and even likely) unrelated to the running process. The running process did nothing wrong and must be resumed exactly as it was, which is why interrupt handlers have to be so careful about saving state.
What the hardware does, and what it doesn’t
To understand exceptions and interrupts, you need to understand how the hardware processes them. This is the critical part, as misunderstanding this protocol will result in nasty bugs. When an ARM64 CPU takes an exception to EL1, it does exactly the following, atomically (i.e., without the possibility of being interrupted again or running other instructions):
- The hardware works out the exception’s type (synchronous / IRQ / FIQ / SError) and where it came from (the same exception level, or a lower one).
- It copies the address to resume at into
ELR_EL1. - It copies the current
PSTATEintoSPSR_EL1. - It sets
PSTATE.{D,A,I,F}to 1, masking debug exceptions, SError, IRQ, and FIQ, so the handler cannot immediately be interrupted again. “Masking” in this context means that these exceptions are ignored by the hardware if they occur (i.e., they are disabled). - For synchronous exceptions, the hardware records the cause in
ESR_EL1(the Exception Syndrome Register), and for memory faults the offending address inFAR_EL1. - The hardware selects
SP_EL1as the stack pointer and switches to EL1. - It sets
pctoVBAR_EL1+ an offset determined by the current exception level, execution mode, and the nature of the exception (see below).
And that is all it does. In particular:
The hardware does not save a single general-purpose register. x0–x30 still hold the interrupted program’s values, and the instant your handler executes its first instruction, it starts destroying them. Saving them is entirely software’s job, which is why the first thing every exception handler in every OS does is stash the registers somewhere.
You already have the code to do that: save_context. This is why we had you implement Quest 2 first!
The exception vector table
The hardware needs to know where to find code to handle exceptions. For flexibility, modern architectures support an exception vector table: a memory location that CPU reads and indexes into when an exception occurs to determine where to jump next. The exception table’s layout is fixed, but the kernel can put whatever code it wants into the table, and it can put the table anywhere in memory. The CPU finds the table by reading a system register called VBAR_EL1 (Vector Base Address Register). Your kernel must write to this register to point it to your exception vector table.
This is the sense in which a vector table must be “programmed into the hardware”: the hardware provides the mechanism and the layout, and the kernel provides the table and tells the CPU where it is.
Concretely, step 7 above says the CPU jumps to VBAR_EL1 plus an offset. VBAR_EL1 (Vector Base Address Register) is a system register that you must write: until you do, its value is garbage and any exception sends the CPU to a random address.
The exception vector table on ARM64 is a 2 KiB region (so VBAR_EL1 must be 2 KiB-aligned) containing 16 entries of 128 bytes each. It is organized as four groups of four:
| Offset | Group: where the exception came from | Example use |
|---|---|---|
0x000 | Current EL, using SP_EL0 | Exceptions handled in user mode (unused in our OS) |
0x200 | Current EL, using SP_ELx (x > 0) | Exceptions while running in the kernel (EL1, so x = 1) |
0x400 | Lower EL, in AArch64 | Exceptions in user mode (EL0), used in Project 4 |
0x600 | Lower EL, in AArch32 | Exceptions in 32-bit user mode (unused in our OS) |
and within each group:
| Offset within group | Exception type |
|---|---|
+0x00 | Synchronous |
+0x80 | IRQ |
+0x100 | FIQ |
+0x180 | SError |
Note that each entry in the table is 128 bytes of space for actual machine instructions. In other words, the table doesn’t contain a pointer, but actual code and the CPU jumps straight into the code in the appropriate location in the table. But the amount of code is limited: 128 bytes is 32 instructions, which is enough for a short handler but not for a real one, so in practice each entry contains a branch to the real handler.
For this project, your kernel and your processes both run at EL1 using SP_EL1, so the entries you need are in the second group: the synchronous entry at 0x200 (for kernel bugs, and for a deliberate svc you’ll use to test) and the IRQ entry at 0x280 (your timer). Fill the other fourteen with a branch-to-self (b .), so that an unexpected exception hangs in an identifiable place rather than executing whatever follows.
Why four groups? What are the other twelve entries for?
The groups exist because a kernel needs to handle the same kind of exception differently depending on where it came from. An IRQ that arrives while a user program is running means “preempt the user program”. An IRQ that arrives while the kernel is running means something much more delicate (the kernel may be halfway through a data structure update). A page fault from EL0 is a normal event to be handled; a page fault from EL1 is a kernel bug. Giving each case its own entry point means the handler does not have to start by working out which situation it is in.
You will use the “lower EL, AArch64” group (0x400) in Project 4, when your processes move to EL0: system calls will arrive at 0x400 and timer interrupts at 0x480. The AArch32 group you will never use, because nothing in your OS runs 32-bit code.
What you need to do: handling exceptions
In the first step, you will add support for your kernel to handle exceptions. This is a prerequisite for preemption, because the timer generates an interrupt, which is a kind of exception.
Part A: the exception vector table
Task: Build and install an exception vector table, and handle synchronous exceptions.
- In
kernel/exceptions.S, define a 16-entry exception vector table as described above. The table is merely an assembly language label that is followed by instructions laid out in a specific way in memory. This requires somewhat delicate assembly, so we provide a skeleton for you:
.section .text                    // 1. put the table in the code segment
.globl exception_vector_table     // 2. make the exception vector table visible to C code
.balign 0x800                     // 3. align the table to a 2 KiB boundary, as hardware requires
exception_vector_table:           // 4. label that defines the actual table and its memory location
// Current EL, using SP_EL0 (unused in our OS)
    .balign 0x80                  // ensure 128-byte alignment for next entry
    b .                           // 0x000: synchronous
    .balign 0x80                  // ensure 128-byte alignment for next entry
    b .                           // 0x080: IRQ
    .balign 0x80                  // ensure 128-byte alignment for next entry
    b .                           // 0x100: FIQ
    .balign 0x80                  // ensure 128-byte alignment for next entry
    b .                           // 0x180: SError
// Current EL, using SP_ELx (x > 0)
// [... repeat as above for the other three cases ...]
Note the following:
- Using
.balign 0x800before the table itself ensures that the linker aligns it with a 2 KiB boundary in memory. - Similarly,
.balign 0x80between entries ensures that the assembler places the instructions that follow at the right offsets, spaced 128 bytes apart as required by the hardware. b .is an ARM64 assembly shorthand for an instruction branching back to itself (i.e., an infinite loop).
Now, make sure the CPU uses your new exception table and handle some exceptions!
Write a helper function that takes an address (e.g.,
exception_init(void* table_addr)). Use inline assembly in C to write the address toVBAR_EL1with themsrinstruction, or define a small assembly function that does it. Call your function fromkernel_mainand pass your exception vector table’s address, which you can access as the global label you defined (e.g.,exception_vector_tablein above example).Write the entry code for a synchronous exception taken at EL1 (offset
0x200). It should save the context exactly asyield_entrydoes—but without the steps that imitate the hardware, because here the hardware really did mask interrupts and setELR_EL1andSPSR_EL1—and then call a C function to handle exceptions (e.g.,handle_exception).Write that C function to handle exceptions (e.g., in
kernel/interrupts.c). A synchronous exception at EL1 means a bug in your kernel, so this function should print everything useful and thenpanic(). Print at leastESR_EL1(and its exception class, bits 31:26, which tells you what kind of fault it was),ELR_EL1(the faulting instruction’s address), andFAR_EL1(the faulting data address, for memory aborts).
To test this, add a deliberate asm volatile("svc #0"); somewhere in kernel_main. An svc at EL1 raises a synchronous exception to EL1, so you should see your handler’s output and a panic. Exception class 0x15 means “SVC instruction executed in AArch64 state”—if you see that, then your exception vector table, your VBAR_EL1, your context save, and your decoding all work. Remove the svc afterwards.
Hints
.balign Nadvances the assembler to the next multiple ofN, padding as needed. Get the alignment directives wrong and your handlers will be at the wrong offsets, which means an exception will land in the middle of a different handler. Check your work withaarch64-elf-objdump -d kernel/kernel-qemu.elfand look at the addresses of your entries relative to the table’s start: they must be at multiples of0x80.- Many of the above steps require interacting with system registers (e.g.,
VBAR_EL1,ELR_EL1, orFAR_EL1). Themsrinstruction writes a value to a system register, and themrsinstruction reads a value from a system register. You can use inline assembly in C to do this, or define small assembly functions that do it and call them from C. - We give you some constants for decoding
ESR_EL1(the exception-class shift and masks) inkernel/aarch64.h, alongside theSCTLR/HCR/SPSRdefinitions. Use them for step (4). - The exception class values are listed in the Arm Architecture Reference Manual; you only need a couple of them, and the panic output will tell you the number so you can look it up when something unexpected happens.
- This handler will pay for itself many times over during the rest of the quest. Make its output good.
🤖 AI coding: auxiliary use allowed. You may use AI to help you create and debug the code for your exception vector table and for the inline assembly needed for steps (2) and (4). You may not use an AI agent (or chatbot) to generate the full exception handling code for you. You should assume that we may ask you to explain exactly what code runs when an exception occurs and how it works, so you must understand it fully.
Why? The vector table is the mechanism by which a kernel becomes able to handle anything the hardware throws at it, and the fact that a kernel must construct and install one is a specific learning goal of this project. The table is almost entirely alignment directives and branches, which is conceptually simple but involves somewhat arcane syntax. Several steps of this task require writing inline assembly within C code, which similarly can get syntactically complex. Asking AI to explain the syntax needed to achieve what you want or how the ARM64 exception model works (if that is useful to you) is a good use of it.
For context, see the principles around AI use in CS 1670.
In the next step, you will add support for timer interrupts. This requires understanding how the hardware timer device works, and how to handle the interrupt it generates.
Background: the timer
To be preempted on a schedule, you need hardware that generates an interrupt on a schedule. The Raspberry Pi offers you a choice:
- The BCM2835 “System Timer” (§12 of the peripheral manual you used in Project 1) is the obvious candidate, and it is what the datasheet documents. Unfortunately QEMU does not emulate it, so code written against it works on real hardware and does nothing at all under emulation. We therefore do not use it for this project.
- The ARM Generic Timer is part of the ARM CPU core itself rather than the Raspberry Pi’s peripherals, and it is emulated by QEMU and present on real hardware. We’ll use this one.
Because the generic timer is an ARM feature, it is not in the Raspberry Pi’s peripheral datasheet, and you do not talk to it via MMIO. Instead, it is controlled through system registers, using mrs and msr:
| Register | Meaning |
|---|---|
CNTFRQ_EL0 | Read-only: the timer’s tick rate, in ticks per second. |
CNTPCT_EL0 | Read-only: the current 64-bit tick count. Useful for measuring things. |
CNTP_TVAL_EL0 | A down-counter. Write N and the timer will fire N ticks from now. |
CNTP_CTL_EL0 | Control: bit 0 = ENABLE, bit 1 = IMASK (1 masks the interrupt), bit 2 = ISTATUS (read-only: 1 when the timer condition is met). |
Why do these registers have “EL0” in their names, even though we’re running at EL1?
The reason is that the registers will ultimately be accessible from EL0 (user mode) as well as EL1 (kernel mode). The ARM architecture allows user-mode code to read the tick count and tick rate, and to arm the timer, but not to mask or acknowledge the interrupt. Even though your current code runs in EL1, the interrupt will still happen when you configure the timer through these registers, and you will be able to reuse the same code without change when you move your processes to EL0 in Project 4.
The tick rate is not the same in QEMU and on hardware. QEMU’s emulated Raspberry Pi 3 reports 62.5 MHz; a real Raspberry Pi 3B+ reports 19.2 MHz. If you hard-code a tick count, things will happen at very different time scales on real hardware and in QEMU.
A better plan than had-coding is to read CNTFRQ_EL0 to get the actual tick rate (in ticks/second) and compute the tick count for the time interval you actually want. If you want a timer to go off in 100 ms, that is CNTFRQ_EL0 / 10 ticks. This is a small thing, but it is exactly the kind of difference between emulation and real hardware that makes OS development hard. Reading a frequency from the hardware rather than assuming it is a more robust approach.
Finally, generating an interrupt is not the same as delivering one. The timer’s interrupt signal has to be routed to your CPU core by a device called an “interrupt controller”. On the Raspberry Pi 3, the relevant registers for configuring the interrupt controller are neither in the BCM2835 peripheral manual nor in the ARM architecture manual: they are in a third document covering the “ARM local peripherals”, the parts of the chip that sit next to the ARM cores. See Appendix B for what to read. Their base address is 0x4000'0000, immediately above the peripheral region you have been using.
What you need to do: taking timer interrupts
In order to handle timer interrupts, we need to first tell the hardware to generate them. This involves a device driver for the timer device, and some code to set up the interrupt controller to enable the interrupts and deliver them to your CPU core.
Part B: the timer driver
Task: Write or generate a device driver for the ARM generic timer in kernel/drivers/timer.c, with its interface in kernel/drivers/timer.h. It should provide an interface similar to the following three functions:
timer_init(void (*callback)(void)): reads the hardware tick rate, computes the tick count corresponding to the desired frequency of interruption (“quantum”), enables the timer, records the callback to invoke when it fires, and arms the first timer.timer_set(uint64 interval_ticks): arms the timer to fireinterval_ticksticks from now.timer_interrupt(void): called when the timer fires. Re-arm the timer first, then invoke the callback.
We will use the timer exclusively to preempt processes, so the callback will be your scheduler. The frequency of interruption defines the scheduler’s quantum: the amount of time a process gets to run before it is preempted. Choose a quantum somewhere in the 10–100 ms range.
Hints
- Re-arm before you call the callback, not after. The callback ends up in your scheduler, which never returns—so anything you were planning to do after calling it will never happen. Getting this backwards produces an OS that preempts exactly once and then never again.
- Re-arming is how you acknowledge this interrupt. For the generic timer, the interrupt is asserted for as long as the timer condition holds (
CNTP_CTL_EL0.ISTATUS== 1), and writingCNTP_TVAL_EL0clears that condition. If you forget, the interrupt re-asserts the moment you enable interrupts again and your kernel does nothing but take timer interrupts forever. Such “interrupt storms” from a missing acknowledgment are one of the classic device-driver bugs that can cripple a system. CNTFRQ_EL0’s upper 32 bits are reserved: mask them off.- Inline assembly is how you reach system registers from C.
__asm__ volatile("mrs %0, CNTFRQ_EL0" : "=r"(freq));reads one;__asm__ volatile("msr CNTP_TVAL_EL0, %0" : : "r"(ticks));writes one. Use the operand syntax rather than hard-codingx0(asking AI to help you if necessary). This lets the compiler pick registers and avoids a category of subtle bug. - Add some sanity checks to your driver (that the callback is non-null, that the period is non-zero). A null function pointer call at this level of the system produces spectacularly unhelpful symptoms.
- If reading
CNTFRQ_EL0or writingCNTP_CTL_EL0from EL1 causes an unexpected synchronous exception, the cause is that EL2 has not granted EL1 access to the physical timer (CNTHCTL_EL2.EL1PCEN/EL1PCTEN). QEMU and the Raspberry Pi firmware normally set this up before handing your kernel control, so you should not hit this—but if you do, that is where to look.
🤖 AI use/coding: allowed, including agentic coding. You can generate the timer device driver with AI; see below for some hints for how to do this effectively.
Why? You have already written a device driver in Project 1. Although this one is different—it uses system registers rather than MMIO—the general notion of setting up the hardware and operating on it is similar and the learning benefits are limited. Some of the inline assembly required is gnarly, and having AI help will ensure that you don’t spend enormous amounts of time debugging syntax issues.
Important note: even though you can use AI here, you must understand your code. In particular, understanding how and when the timer gets armed and how you can set a timer for a given wall-clock time even though the hardware counts ticks are important learning goals for the assignment.
For context, see the principles around AI use in CS 1670.
Helpful hints for effective AI use
- Tell the AI explicitly that you want a device driver for the ARM generic timer on core 0 of a Raspberry Pi 3B, so that it knows what device to target.
- It is a good idea to provide an API of function signatures to your AI, so that it knows what functionality you want.
- You may benefit from writing a prompt that outlines what registers you want to read/write in a given function, as this will guide the AI towards an implementation that matches what our assignment expects.
Part C: route and dispatch the interrupt
It’s not quite enough to have a timer that generates an interrupt: the interrupt has to be delivered to your CPU core, and your kernel has to figure out what happened and dispatch it. This is the final piece of the puzzle for preemption.
Interrupt delivery is handled by the interrupt controller, which is a hardware device responsible for routing and delivering interrupts to the CPU. Like many hardware devices, the interrupt controller is memory-mapped, so you can configure it via MMIO and reading/writing device registers.
You’re welcome to work out the details for yourself—they aren’t that complicated—but the interrupt controller is mostly plumbing in the context of this assignment, so we will give you the relevant code below if you want to use it. The ARM local peripherals documentation (see Appendix B) describes the relevant registers for the ARM CPU’s interrupt controller.
In particular, you will need:
- The
ARM_LOCAL_PERIPHERALS_BASEaddress, which is0x40000000. This is already defined for you inkernel/memlayout.h. - The “Core 0 timers interrupt control” device register, and specifically the bit in it that enables the IRQ for the physical non-secure timer (the one
CNTP_*controls). - The “Core 0 interrupt source” register, which tells you which of core 0’s interrupt sources has triggered an interrupt.
Using these three memory-mapped locations, you should write a helper function to enable the interrupt controller and timer interrupts for core 0.
Give me the necessary code...
We recommend adding the definitions for the relevant MMIO registers to kernel/interrupts.h as offsets from ARM_LOCAL_PERIPHERALS_BASE, similar to how you defined the UART and GPIO registers in Project 1. For example, you could put the following into kernel/interrupts.h:
#define CORE0_TIMER_IRQ_CTRL (ARM_LOCAL_PERIPHERALS_BASE + 0x40)
#define CORE0_INTERRUPT_SOURCE (ARM_LOCAL_PERIPHERALS_BASE + 0x60)
The key function that makes use of these definitions is a function to enable the interrupt controller and timer interrupts for core 0; say, enable_interrupt_controller() in kernel/interrupts.c. Its logic looks like this:
void enable_interrupt_controller(void) {
    // Enable the ARM generic timer for core 0 by setting bit 1 of
    // the CORE0_TIMER_IRQ_CTRL register.
    mmio_write32(CORE0_TIMER_IRQ_CTRL, (0b1 << 1));
}
Call this function from kernel_main.
In addition to this, you need two more pieces:
- A handler function that detects which interrupt occurred and calls the appropriate handler (in this case, the timer interrupt handler).
- Code in your exception vector table that jumps to this handler when an interrupt occurs in EL1.
For the first, you’ll want to write a function with a signature handle_interrupt(context_t* trapframe), e.g., in kernel/interrupts.c. This function should read the interrupt source register to determine which interrupt occurred, and then dispatch to the appropriate handler. For the timer interrupt, it should call timer_interrupt(). If any other interrupt occurs, it should call panic() for now.
Task: Get the timer’s interrupt delivered to your core, and dispatch a handler.
- Write (or copy/generate) the code to enable the interrupt controller and timer interrupts for core 0. Call it from
kernel_mainafter you initialize the timer. - Write the interrupt exception entry code in
kernel/exceptions.S, at the “interrupts/asynchronous exceptions” offset of the “current EL withSP_ELx” group (0x280). It is the same shape as your synchronous entry: make room, savefp/lr,bl save_context, savespintox0to pass the location of the saved context (the “trapframe”), and callhandle_interrupt. - Write
handle_interrupt(context_t* trapframe)inkernel/interrupts.c. It should record the interrupted context, whose saved version you have access to in thetrapframeargument, incurrent_process->context(this is the context that will be resumed if this process is scheduled again), then read the interrupt source register to find out what happened, and call the right handler. - Write (or generate) three small helpers you will want now and need later:
enable_interrupts(),disable_interrupts()(which returns the previous interrupt state), andrestore_interrupts(unsigned long flags). These helpers all manipulate thePSTATEregister’sDAIFbits:msr DAIFCLR, #2unmasks IRQs,msr DAIFSET, #2masks them, andDAIFcan be read and written wholesale withmrs/msr.
Hints
- The code for step (2) is almost identical to the synchronous entry code you wrote in Part A, except that it branches to
handle_interruptinstead ofhandle_exception. - For step (3), your code should use
mmio_read32to read the Core 0 interrupt source register, and then test the bit corresponding to the timer (bit 1, or0b1 << 1). If that bit is set, calltimer_interrupt(). If any other bit is set, callpanic(). - Test in stages. Before you connect anything to the scheduler, make
handle_interruptjustprintf("tick!\r\n")andrestore_context(tf). If you see a tick roughly every quantum and the interrupted process carries on afterwards, your entry code, your driver, your routing, and your context save/restore all work correctly independently of the scheduler. disable_interruptsshould return the previous state of interrupts (rather than nothing) because the caller might already have had interrupts masked and blindly re-enabling them afterwards would be wrong. This is a small design decision that matters: this is why we recommend arestore_interrupts(flags)helper in addition toenable_interrupts().- The interrupt source register reports a bitmask, not a number. Test the right bit (bit 1), as there could be multiple interrupts pending.
🤖 AI coding: allowed, including agentic coding for the code to enable the interrupt controller and timer interrupts, as well as the helpers in step (4). Auxiliary use allowed for handle_interrupt and the IRQ entry code.
Why? The interrupt controller configuration code is short, but not very pedagogically valuable and highly device-specific. The DAIF helpers in step (4) are three one-line inline-assembly functions where the only difficulty is GCC’s syntax. Using AI to help is a reasonable use of it and we allow it here. However, what happens on an interrupt, what state must be preserved, and how the kernel figures out which device interrupted are core learning goals, and the code is short, so you should write and understand it yourself.
For context, see the principles around AI use in CS 1670.
Part D: preempt
Everything is now in place, and connecting it is almost anticlimactic: a timer interrupt should cause the running process to be suspended and another process to run, which is precisely what yield() already does (except only if processes decide to do so voluntarily).
But there is one more thing to pay attention to that is easy to get wrong.
Recall step 4 of what the hardware does on an exception: it masks (disables) IRQs. That is essential—it keeps your handler from being interrupted again—but it means that after your first timer interrupt, interrupts are disabled. If nothing ever re-enables them, exactly one process gets preempted once and no timer interrupt ever happens again.
So: who unmasks interrupts? Follow the control flow. Your timer interrupt handler never “returns” in the ordinary sense; it ends by calling restore_context, whose last instruction is eret, which restores PSTATE from the saved SPSR_EL1 value in your saved context. So, the state a process resumes with is whatever is in its saved SPSR_EL1—and that comes from SPSR_PROC, the constant you used in Quest 2 with all interrupts masked.
Change that constant to leave interrupts unmasked (i.e., enabled), and every eret back into a process will re-enable interrupts as part of resuming it. Nothing else is needed. This gives rise to a rule about interrupt discipline in our OS at this point that is worth stating explicitly:
Interrupt discipline in your kernel: processes run with IRQs enabled; the kernel runs with IRQs disabled.
- Entering the kernel via an interrupt: the hardware masks IRQs. ✓
- Entering the kernel via
yield(): youryield_entrystub masks IRQs itself (line 1). ✓ - Leaving the kernel:
eretrestores the process’sSPSR, which has IRQs unmasked. ✓
This covers every path in and out of the kernel, requires no explicit “enable interrupts” call anywhere, and the context switch can never be interrupted halfway through. Keep this invariant in mind—violating it by accident has cost the course staff many hours of debugging.
Important note: This rule holds for our kernel at this point in the course. The rule is not universal and real OSes run with interrupts enabled in large parts of kernel code. It is a design choice that simplifies things for now, but we will revisit it later.
Task: Make the timer preempt the running process.
- Write callback function that should run when a timer interrupt fires, and pass it to
timer_init. Your callback function should simply call the kernel’syield()function. - Change
SPSR_PROCinkernel/aarch64.hso that interrupts are unmasked (leave FIQ and SError masked). The constants for the individual mask bits are already in that file. - Run all three processes—including
primecheck, the one that never yields—and watch them share the CPU.
Hints
- If preemption happens exactly once and then stops, it is one of two things: you did not change
SPSR_PROC, or you did not re-arm the timer. - If your OS dies shortly after the first timer interrupt, print the interrupted context’s saved
SPSR_EL1inhandle_interrupt. If its low four bits are not0b0101(EL1h), you are saving or restoring the wrong thing somewhere. - Note how little code Part D requires. That is the payoff for having built the mechanism carefully:
yield()does not know or care whether it was reached cooperatively or by preemption, because in both cases a context was saved by the same code in the same format. If you find yourself needing to changeyieldor the scheduler here, something is off.
🤖 AI use/coding: auxiliary use allowed. You can ask AI to help you with syntax, where to put the callback and how to pass it to timer_init, and how to change the SPSR_PROC constant. You may not ask AI to write the callback function or the code that connects the timer interrupt to yield().
Why? This is a handful of lines, but the reasoning behind them—especially “who re-enables interrupts, and when”—is exactly the sort of thing we will ask you about. Talking it through with AI is fine, but it write the code for you is not, as it means skipping the only part of this step that has any substance.
Part E: make printf atomic
Run your three processes and look carefully at the output. Sooner or later you will see something like this:
Process counter: 1Process primecheck: Found another 1000 primes; last one was 7919!
2
A timer interrupt arrived while the counter process was in the middle of printing a line. Its printf—which, remember, is your kernel’s printf, running on counter process’s stack—was suspended halfway through pushing characters into the UART, another process ran and printed its own line, and then counter resumed and finished.
The UART is a shared resource, and you now have preemption, which means two processes can be in the middle of using it at once. The fix is to make the part of printf that touches the UART a critical section: a region of code that must not be interrupted. You have exactly the tool for that from Part C.
Task: Protect the output path of your printf so that a line is emitted without interruption. Use disable_interrupts() to mask interrupts before emitting and restore_interrupts(flags) to put the previous state back afterwards.
Then think about the cost of what you just did. While interrupts are masked, no interrupt can be handled, including ones you might care about a great deal. At 115,200 baud, emitting an 80-character line takes about 7 milliseconds. If your quantum is 100 ms, you have just made up to 7% of the CPU’s time un-preemptible. What would happen if you lowered the baud rate to 1200?
Hints
- Use
restore_interrupts(flags), notenable_interrupts(). Yourprintfis also called from kernel code that may already have interrupts masked (yourpanic, for instance), and unconditionally enabling them there would be a bug. This is whydisable_interruptsreturns the old state. - Mask around the emitting, not around the format-string parsing. The parsing does not touch shared state, and the shorter your critical section that runs with interrupts disabled, the less interrupt latency you add.
- If your
printfuses astaticbuffer rather than a local one, you have a second and more serious problem: preemption can corrupt the buffer itself, not merely interleave the output. Make the buffer a local variable, or extend the critical section to cover the whole function.
🤖 AI use/coding: NOT allowed.
Why? The change is three lines. The reason for it—a shared resource plus preemption equals a race condition—is an important idea, and it is the seed of everything you will learn about synchronization.
Check your work
With all three processes running and preemption on, you should see hello and counter making progress via yield() and primecheck getting a share of the CPU without ever yielding:
Process hello: before yield
Process counter: 0
Process primecheck: Found another 1000 primes; last one was 7919!
Process hello: after yield
Process hello: before yield
Process counter: 1
Process primecheck: Found another 1000 primes; last one was 17389!
Process hello: after yield
...
The exact interleaving depends on your quantum and on how long primecheck takes between prints, so your output will not match ours line for line. What must be true is that (a) all three processes make progress forever, (b) primecheck is being interrupted, since it never yields, and (c) no line of output is spliced into the middle of another.
Some things worth checking deliberately:
- Preemption really is happening, repeatedly. Add a counter to
handle_timer_interruptand print it every nth interrupt. It should climb forever. - The quantum is what you think it is. Time 100 interrupts against a stopwatch, or read
CNTPCT_EL0in the handler and print the difference between consecutive interrupts. - Try a much shorter quantum (say 1 ms) and a much longer one (say 1 s), and watch what happens to the feel of the output. Does it match what you expect?
Congratulations—you have built a preemptively multitasking operating system. Three programs, none of which knows the others exist, sharing one CPU, with your kernel in charge 🎉! If you are in CS 1670, that completes the project (modulo hand-in). If you are in CS 1690/2670, there is still one quest to go.
Bonus Quests (Extra Credit)
Important note: All extra credit work requires you to meet with an instructor at office hours to discuss your work in order to get credit. There will be no exceptions to this, since extra credit is strictly optional.
Quest 4-E1: What does a context switch cost? (moderate)
You now have a scheduler with a knob on it (the quantum) and a mechanism whose cost you have never measured. Let’s fix that.
CNTPCT_EL0 gives you a monotonically increasing tick count, and you know the tick rate from CNTFRQ_EL0, so you can measure elapsed real time to well under a microsecond.
Task (extra credit): Measure the cost of a context switch in your OS, and use it to quantify the quantum trade-off.
- Instrument your switch path to measure how long a context switch takes: from just before the context is saved to just after the next process is resumed. Report it in both ticks and nanoseconds. (Think carefully about where to read the clock: the switch does not “return”, so you cannot simply bracket a function call.)
- Take enough measurements to say something about the distribution, not just a single number. Is it stable? If not, why not?
- Work out, from your measured cost, what fraction of the CPU your OS spends switching at quanta of 100 ms, 10 ms, 1 ms, and 100 µs. Then verify one of your predictions by measuring how much slower
primecheckgets. - Write up your numbers and your reasoning (half a page is plenty).
If you have real hardware, compare your numbers to QEMU’s. They will be very different, and the reasons why are interesting.
🤖 AI use/coding: allowed, including agentic coding. We generally allow AI for extra credit quests, but you must understand your implementation fully. To get credit, you will need to discuss your work with an instructor in person.
Quest 4-E2: sleep() (moderate)
Your processes have two options: run, or give up the CPU and be scheduled again immediately. There is no way for a process to say “wake me in 500 milliseconds”. Adding one requires the piece of process state your descriptor does not have yet: a process that is neither runnable nor running, but waiting.
Task (extra credit): Implement sleep(ms), exposed to user programs through the same trampoline mechanism as yield.
You will need to: add a BLOCKED state to your process descriptor and handle it in pick_next; record when each sleeping process should wake up; check for expired sleepers on each timer interrupt and make them RUNNABLE again; and decide what your scheduler should do when every process is blocked (see wfi). Demonstrate it with a program that prints a message once a second while other processes keep running.
Then answer: your wakeup precision is limited by your quantum. What would you have to change to make sleep(1) accurate to a millisecond, and what would it cost?
🤖 AI use/coding: allowed, including agentic coding. We generally allow AI for extra credit quests, but you must understand your implementation fully. To get credit, you will need to discuss your work with an instructor in person.
Quest 4-E3: An interrupt-driven UART (high difficulty)
Remember the calculation from the background section at the start of this handout: your polling UART driver burns roughly 120,000 instructions per character waiting for the hardware. Now that you have interrupts, you can stop doing that—and in doing so, you will build the thing that actually motivated processes in the first place.
The receive direction is the more interesting one, because it is where “the device needs attention now” really bites: a character arrives whenever the human at the other end types it, and if you do not collect it before the next one arrives, it is gone.
Task (extra credit): Make your UART driver interrupt-driven for receive.
You will need to: enable the PL011’s receive interrupt (the IMSC register—see §13 of the BCM2835 peripheral manual, along with the masked-interrupt-status and interrupt-clear registers); enable the UART’s IRQ in the BCM2835 interrupt controller (§7 — note that this is a different interrupt controller from the ARM-local one you used for the timer, and that the manual’s IRQ table has known errata); extend your handle_interrupt to dispatch on more than one source; and buffer received characters in the kernel so that nothing is lost between interrupts.
Then have a process do something with the input—echo it, or accumulate a line and print it back.
If you want to go further: add a way for a process to block until input is available (Quest 4-E2 gives you the state you need), so that a process waiting for a keystroke consumes no CPU at all. At that point you will have built, in miniature, the exact mechanism this project’s background section opens with.
🤖 AI use/coding: allowed, including agentic coding. We generally allow AI for extra credit quests, but you must understand your implementation fully. To get credit, you will need to discuss your work with an instructor in person.
Quest 5: A better scheduler (CS 1690/2670)
Files: kernel/scheduling.c, kernel/proc.h, plus a write-up.
This quest is required for CS 1690/2670 students only. CS 1670 students are welcome to attempt it for their own interest, but it is not graded for you.
Overview
Round-robin scheduling is very simple. In this quest you will research one scheduling algorithm that is more sophisticated, implement it, and argue for it.
Why are we doing this?
“Which process should run next?” is a design question, not a technical one, and the answer depends entirely on what you are trying to achieve. Round-robin’s crude equality is the right answer for some workloads and badly wrong for others. One way to really see that is to build an alternative and watch it behave differently on the same programs.
This is also a taste of what OS research and kernel engineering actually feel like: reading about a design, deciding what it is really optimizing for, mapping it onto the code you have, and then defending the result.
Background: your workload
Notice that the three programs you have been running are not interchangeable. hello and counter are I/O-bound: they do a tiny amount of work and then give up the CPU. primecheck is CPU-bound: it will use every cycle you give it and never volunteers to stop. This mix—a few interactive processes and a background hog—is the classic scheduling scenario, and it is exactly the situation in which round-robin’s behavior is unsatisfying: primecheck gets a full quantum every time round, while counter uses a fraction of its own and hands the rest back. As a result, over time counter receives far less actual time on the CPU, something that a user might find “unfair”.
Whatever algorithm you choose, this is the workload to evaluate it on. You may add user programs if a different mix shows off your scheduler better; say so in your write-up if you do.
Note that “fairness” is not the only thing one might want, and different schedulers optimize for different quantities:
| Metric | What it means | Who cares |
|---|---|---|
| Throughput | Work completed per unit time. | Batch systems, build servers. |
| Turnaround time | How long from submission to completion. | The person waiting for their job. |
| Response time | How long from a request until the program reacts. | Anyone typing at a keyboard. |
| Fairness | How evenly the CPU is divided. | Everyone sharing a machine. |
These conflict. Short quanta improve response time but waste more CPU on switching overhead. Always running the shortest job first minimizes average turnaround time but can starve long jobs forever. Prioritizing interactive programs makes interactive desktop computing feel responsive, but makes a background compilation job run slowly. There is no optimal scheduler, only schedulers that are good for particular goals—which is why real kernels have several, and why Linux’s default one has been replaced twice in the last twenty years.
Even your quantum length is a trade-off you will feel directly. If a context switch costs (say) 2 microseconds and your quantum is 100 milliseconds, you spend 0.002% of the CPU on switching. Shrink the quantum to 10 microseconds and you spend 20% of the CPU shuffling registers around.
What you need to do
Task: Choose one of the three algorithms below, research it properly, implement it in your kernel, and write it up.
Option 1: Multi-level feedback queue (MLFQ)
Keep several run queues at different priority levels. New processes start at the top. A process that uses its entire quantum without yielding is demoted to a lower-priority queue; a process that gives up the CPU early stays where it is (or is promoted). Always run something from the highest non-empty queue, and give lower queues longer quanta.
To implement the queues, you can either write yourself an in-kernel linked list (or ask AI to generate one for you), or use an array of NPROC members of type struct proc* and a head/tail index for each queue (the latter allows for a fixed number of processes per queue, but the total number of processes on our OS is currently limited to NPROC anyway).
The elegance of MLFQ is that it infers what kind of process it is dealing with from behavior alone, without being told: a process that keeps blocking must be interactive and gets priority; a process that keeps burning whole quanta must be a compute-bound job and gets moved out of the way. Variants of this idea have been in essentially every commercial OS scheduler.
Things to think about: how many queues should you use, and what quantum size is appropriate for each? What stops a CPU-bound process from being starved forever at the bottom (look up priority boosting, and think about why it is needed)? Can a process game your scheme by yielding just before its quantum expires?
Option 2: Lottery or proportional-share scheduling
Give each process a number of tickets. To pick the next process, hold a lottery: draw a random ticket and run its owner. A process with twice as many tickets gets twice as much CPU, in expectation. Deterministic variants (stride scheduling, and the virtual-time schemes that Linux’s CFS and EEVDF are built on) achieve the same proportions without randomness by tracking how much CPU each process has already had.
The appeal here is that the scheduler’s goal is stated explicitly and directly: shares, not priorities. It is much easier to reason about “this process should get 20% of the CPU” than about what a priority number means.
Things to think about: where do you get random numbers from, given that your kernel has no access to a standard library (read about random number generator (RNG) devices, or come up with a different scheme)? How well do the proportions hold over short intervals versus long ones—and how would you measure that? If you go deterministic instead, what exactly do you track, and how do you handle a process that has been blocked for a long time and now has a very low accumulated time?
Option 3: Priority scheduling with aging
Give each process a priority and always run the highest-priority runnable one. This is straightforward and it starves everything below the top, so add aging: a process that has been waiting increases in priority over time, until eventually it outranks the incumbent.
This is the simplest of the three to implement and the most interesting to tune, because the aging rate is a single number that trades responsiveness against fairness in a way you can measure directly.
Things to think about: what priority does a process start with, and does anything ever lower it again? How fast should aging be, relative to your quantum? What happens with two processes at equal priority? Can you construct a workload where your scheme behaves badly?
Then, in a file called SCHEDULER.md in your repository, write up your implementation (no more than ~500-1000 words):
- Which algorithm you implemented, and how. A brief description of your design and the parameters you chose, including any state you added to
struct proc. - What it optimizes for, and what it gives up. Every scheduler is better than round-robin at something and worse at something else. Be specific about both, referring to the metrics mentioned above.
- Evidence. Show that your scheduler behaves differently from round-robin on the same programs, and explain why the difference is what your design predicts. Output transcripts are fine; measurements (how much CPU each process got over 10 seconds, say) are even better and not much more work given a tick counter.
- One workload where your scheduler is a bad choice. Every design has weaknesses. Find one in yours and describe it!
Hints
- Keep round-robin around, behind a compile-time flag or a function pointer, so you can switch between the two and compare. This makes point 3 dramatically easier, and it is also good engineering and we may need it for grading.
- If your
pick_nextis cleanly separated fromresume/scheduler, this quest touches almost nothing else. If it is not, separating them first is time well spent. - Most of these algorithms need to know how much CPU a process has used. A counter in
struct proc, incremented on each timer interrupt for the running process, is enough, and it is also what you need for point 3. ACNTPCT_EL0-based measurement is more precise if you want it. - Distinguishing “gave up the CPU early” from “used its whole quantum” is the crux of MLFQ, and the information you need is right there:
yield()was reached either fromyield_entryor from a timer interrupt. Make sure your code can tell which. - Read a real description of your algorithm rather than working from this handout’s paragraph. Operating Systems textbooks such as Tom Doeppner’s Operating Systems in Depth or Remzi Arpaci-Dusseau’s Operating Systems: Three Easy Pieces are good sources.
🤖 AI use/coding: auxiliary use allowed. You may—and should—use AI as one of your research tools: ask it to explain an algorithm, compare variants, or help you think through a corner case. You can also use AI to help with your implementation—e.g., to get yourself an in-kernel queue data structure or to suggest how to track information that you need. However, you may not have AI completely design or implement your scheduler, and the write-up must be your own work and your own measurements.
Why? The point of this quest is the reasoning: understanding what an algorithm optimizes for, deciding how it maps onto your kernel, and defending the trade-off you chose. If AI writes the scheduler and the argument, you have skipped the entire exercise. You should expect that we will ask you to explain and defend your design in a whiteboard discussion or CS 1690 course meeting.
Note: be careful with AI-generated claims about scheduling algorithms. In our experience, AI is fluent and confident about them and also quite often wrong about specifics (which OS uses what, how a particular variant handles starvation, what an algorithm actually does). Verify against a real source before you put it in your write-up.
For context, see the principles around AI use in CS 1670.
Handing in & grading
You will submit your work via git, using our grading server, exactly as for Project 1.
Before you submit, make sure that:
make clean && make qemubuilds and runs without errors from a fresh checkout.- Your code is formatted (
make format) and free of debugging spew you did not intend to leave in—in particular, remove the testsvc #0from Quest 4 Part A and any tracing you added to your switch path. - CS 1690/2670 students: your
docs/SCHEDULER.mdfile describing your implementation for Quest 5 is in the repository.
Submitting your code (and checking on the grading server)
- Log into the grading server with the password you received.
- Connect your repository under the “Project 2: Processes” category, if you have not already, and click it to fetch your repository from GitHub.
- Check your code works: use the buttons below the commit list to test your code in our grading environment.
- Set your grading commit with the “Grade this commit” button. You can reassign it at any time before the 72 late hour cutoff.
- Click the “Run submission checks” button to run a set of tests that tell you if there are any known problems with your handin. Passing this check doesn’t guarantee that everything works or is correct, but catches some common issues early.
- After submitting your work, please sign up for a Whiteboard discussion.
Extra requirements for CS 1690/2670 students
_In addition to submitting the project (including Quest 5), you must also check that your code works on the real hardware. For this, you should do the following:
- Run your code on your Raspberry Pi. You can also run on real hardware remotely using the “Run on hardware [1690/2670 only]” button on the grading server, but note that your run might get queued for a while at busy times.
- Ensure that you have a file called
docs/SCHEDULER.mdin your repository, and that it contains your write-up for Quest 5. The text in this file must not be AI-generated.
Note that we only have a single remote-accessible Raspberry Pi and that resetting it for another student to run their code takes about a minute. Don’t leave this to the last minute, as there may be high demand on the remote hardware close to the deadline and you may not be able to test your code in time.
Congratulations, you have made your OS multitask! 🎉
Grading breakdown
Your grade is based on:
- Functionality: We will run your code on the grading server and check that it works as expected (i.e., runs the three programs concurrently). This is worth 50% of your grade and impacts the “Projects” part of the course grade.
- Whiteboard Discussion: You will meet with a course staff member in a small group to discuss the concepts in this project for 45 minutes. The discussion is worth 50% of your grade and impacts the “Whiteboard Discussions” part of the course grade.
- If you are in CS 1690/2670 and complete Quest 5, your write-up of that quest will contribute 1/5 of your overall grade (i.e., the contributions of functionality and whiteboard discussion will be scaled to 40% of your grade each, and the write-up will be another 20%).
We will grade all components according to our honest grading scale.
The Raspberry Pi actually by default runs firmware called the “armstub” that handles the transition from EL3 to EL2. Since we wanted you to see all the privilege levels, we changed the armstub to no longer do this and configured QEMU to also start in EL3. ↩︎
Technically, you could run all the code in this project in EL2. However, QEMU doesn’t emulate ARM64 timers correctly in EL2, so you wouldn’t be able to use the emulator in Quest 4. Since you eventually need EL1 anyway, we make the transition now. ↩︎