Container environment setup
This guide will demonstrate how to set up the tools and development environment we will use for the remaining projects in this course. We will provide our environment using a container, a technology that provides an abstraction of a separate OS without the full overhead of a Virtual Machine (VM). This container runs a Linux-based operating system, Ubuntu 26.04.
When we grade your work, we will use the same container environment–so if your program works in your container, it should work in our grading environment.
Sound familiar? If you’ve taken CS300 or CS330, you may have worked with a similar container setup before. Our container uses slightly different components, so if you already have one from another course, you still need to set up this one.
Even if you’ve set up a similar container environment before, do not skip steps. Our setup is a bit more complex than the one other courses use, and we have some important guidance on how to avoid bugs and performance issues that may not have come up in your other courses, but will cause problems for us.
Why are we using these tools?
- You’ll be able to develop locally. With the container environment, we can specify a standard development environment you can run on your own machine, so your code can work on any system. Thus, you don’t need to log into the department machines to write/test your code!
What if I don't have (or don't want to use) my own computer?
For students who do not have access to their own laptop, note that the Brown IT service provides laptops you can borrow for free
You can technically develop for assignments on the department machines without a container environment, but this is discouraged. Please talk to the instructors if you’re considering this, or if you are unable to otherwise get a loaner system, and we can figure something out.
Task: Follow the below instructions to set up your container environment.
Environment setup
To run our environment, you will need to configure Docker on your host computer. Some of the configuration steps here differ based on your host platform, i.e. the system you are using to run the container, which is probably Windows, Mac OS, or Linux. Please make sure you follow the correct set of instructions for your platform.
Configure docker
Docker is one of the most popular container solutions and widely used in industry. To install Docker.
Download and install Docker Desktop, located here. On Linux machines, follow the instructions here.
Already have docker installed? If you already have Docker installed, we strongly recommend updating to the latest version by reinstalling it from Docker’s website.
Many odd quirks and bugs can result from using old versions of Docker, so updating now is the best way to avoid quirks or other issues from coming up later in the semester!
Mac users: We do NOT recommend installing Docker with homebrew. This may not install the latest version of all of docker’s components, and so is likely to have issues. Please install the version from Docker’s website instead.
On Windows or macOS, open the Docker Desktop application after it has been installed. You may see a message similar to “Your Docker is starting…”. Once this message goes away, your Docker has started successfully!
 Click for extra instructions for Windows-based systems
To run the following steps, you will need to set up Windows Subsystem for Linux (WSL). WSL should already be enabled after you install Docker, but you may still need to install a Linux distribution. This will run in an actual Linux VM, and you will run your Docker container within that VM (turtles all the way down for you!).
Setting up WSL
To set up WSL, do the following:
- Verify that Hyper-V/Virtual Machine Platform is enabled
- Hyper-V/Virtual Machine Platform are Windows’s hardware virtualization products, which may be required to build containers, use WSL, and install Docker. To verify that these are enabled, go to Settings > Apps > Optional Features > More Windows Features, and verify that the boxes for “Hyper-V” and “Virtual Machine Platform” are checked. (If they are not present, do not worry about them). From here, follow the system prompts. Proceed to step 2.
- Do I have a Linux distribution (Linux distro) installed?
- Open a terminal (either Windows Terminal, Powershell, or Command
Prompt) and run
wsl -l -v. If there is only “Docker Desktop” and “Docker Desktop Data”, you do not have a Linux distribution installed. Proceed to step 3. - Otherwise, you have a Linux distro installed. Proceed to step 4.
- Install a Linux Distribution.
- Run
wsl --set-default-version 2to ensure Ubuntu will be installed under WSL 2. - Install “Ubuntu” from Microsoft Store. (link here)
- Click “Open” after Ubuntu is downloaded. A terminal will open and guide you through the installation process.
- Ensure your Linux Distribution runs on WSL 2.
- From the output of
wsl -l -v, find out if your Linux distro is using WSL 1 or WSL 2. If it’s WSL1: - Run
wsl --set-version <distro name> 2to update your distro to use WSL 2.
- Set your default Linux distro
- Run
wsl --setdefault <distro-name>to configure your default Linux distro.<distro-name>should be “Ubuntu” or “Ubuntu-xx.xx” if you installed using step 2.
Using WSL
Now that your WSL has been set up, here’s how to use it. You’ll need to do this whenever you need to use your development environment:
Open a terminal (either Windows Terminal, Command Prompt, PowerShell), enter the command ‘wsl’. You should see your terminal prompt change to looking something like this:

This is your WSL terminal! You can think of WSL as like a separate Linux computer that lives inside your host system–this is used to run Docker, which runs the rest of our course environment (turtles all the way down!).
Warning: If your WSL terminal starts with
root@instead of your username, you will need to configure some extra settings in your WSL installation before continuing. See this section for instructions, and feel free ask us if you have questions or run into issues.If the WSL terminal prompt says something like
/mnt/Users/..., run the commandcd ~to switch to your WSL home directory. The WSL home directory is a place within WSL where your files will be located–you’ll see more of what this means as you follow this project.Next, you will need to connect Docker with WSL. To do so, open your Docker Desktop’s settings (on its top right corner), click “Resources”, “WSL integration”, then enable integration with your Linux distro. Then, click “Apply and Restart”.
Yay, your WSL should now be set up!
⚠️ Going forward, there are two super important things things you need to know about WSL:
Throughout the course, whenever you need to run any commands related to Docker or your course container (which you’ll see in this guide), you need to enter a WSL terminal first
Any files you create inside WSL get stored in a special folder on your host system. We’ll show you how this works in the section on Shared Folders
Enter
wslin your Command Prompt or Powershell, and you’ll enter into your WSL! For the rest of the project, run commands within your WSL Linux environment, unless otherwise specified.Verify Docker is installed by executing the following command in a terminal:
$ docker --versionA Docker version number should be printed.
After installing Docker, a Docker process (the Docker daemon) will run in the background. Run the following command to verify:
$ docker infoThis should print some information about your Docker installation.
If you see the following error:
ERROR: Cannot connect to the Docker daemon at unix:///var/run/docker.sock. Is the docker daemon running?it means Docker hasn’t started running yet. On Windows or macOS,
ensure your Docker Desktop is running. On Linux, try the command sudo systemctl docker restart in a terminal.
Set up the container environment
In Docker, an environment is defined as a Docker image. An image specifies the OS environment that a container provides, as well as other software dependencies and configurations. The instructions defining an image are specified in a file called the Dockerfile.
Next, you will download the course’s setup code and create the CS 1670 Docker image!
To set up your container, do the following:
Open a terminal (on Windows, use a WSL terminal) and
cdto the directory where you cloned your development environment repository. We’ll denote this in the instructions in as<YOUR DIRECTORY>, but fill in whatever name you used (e.g., if your called your directorycs1670, runcd cs1670).Inside this folder, do the following:
$ ./run-container setup
./run-container setup downloads your Docker image, which may take
several minutes. (It’s normal for this script to run for up to 15
minutes.)
You can ignore messages about logging into your Docker account or scanning for vulnerabilities!
Read this if you get errors about permissions on docker.sock
When docker installs itself, it normally sets up your user with
permissions to control docker (via a socket file called
docker.sock). If you don’t have permissions on this socket, you
might need to close and reopen your terminal app, or log out and log
in again, before the permissions changes take effect.
If you are on Linux: you may also need to add your user to the
docker group manually, as follows:
Open a terminal and run:
$ sudo usermod -a -G docker YOUR_USERNAMELog out and log back in for the changes to take effect.
🚨 We do NOT recommend running ./run-container with
sudo. This will start the container, but it could cause other
permissions problems later because the script is no longer running as
your user. If none of these fixes work, please post on EdStem or see
an instructor during office hours.
Extra instructions for Windows users
We have noticed that Docker might use a lot of memory on Windows due to some open bugs with Docker and WSL (the windows component that provides Linux).
If you notice that other programs slowing down or crashing, or otherwise notice docker using lots of memory, see these instructions for how to check Docker’s memory usage and keep it under control.
Entering the container
Once you created your Docker image, we need to create a container running the image. In Docker terms, a container is an instance of an image, which is where you will actually do your work. Docker (and other container frameworks) are designed to easily start up and tear down individual containers based on a single image.
You can enter your container as follows:
Make sure you’re inside the directory
<YOUR_DIRECTORY>, which is the top-level directory of the repository earlier.Run the script
run-containerto start the container, and poke around to get a sense of the environment: (Windows users: If you get errors, see this section for help.)$ ./run-container # enters your Docker container cs1670-user@9899143429a2:~$ # you're inside the container! cs1670-user@9899143429a2:~$ uname Linux cs1670-user@9899143429a2:~$ echo "Hello world!" Hello world! cs1670-user@9899143429a2:~$ ls -lah total 24K drwxr-xr-x 6 cs1670-user cs1670-user 192 Jan 25 22:23 . drwxr-xr-x 1 root root 4.0K Jan 25 22:25 .. -rw-r--r-- 1 cs1670-user cs1670-user 132 Jan 25 22:23 .bash_profile -rw-r--r-- 1 cs1670-user cs1670-user 4.0K Jan 25 22:23 .bashrc -rw-r--r-- 1 cs1670-user cs1670-user 25 Jan 25 22:23 .gdbinit -rw-r--r-- 1 cs1670-user cs1670-user 813 Jan 25 22:23 .profile cs1670-user@9899143429a2:~$ exit # or Ctrl-D
Don’t worry if the number after cs1670-user is different. This is an identifier that uniquely identifies this container.
You may run any Linux commands inside this container, such as running
your code for this course. To exit, enter exit or use Ctrl-D.
Resuming your work / Multiple shells
Once you have exited the container, you can open it again by running
./run-container again from the <YOUR_DIRECTORY> directory. This
will restart your current container if it exited in the same state it
was in before.
If you want to open another shell in the same container, simply open a
new terminal window on your computer, navigate to the
<YOUR_DIRECTORY> directory and run run-container–the script will
automatically detect that the container is already running and
“attach” itself to the current container.
Working in the container environment
Shared folders
“If my docker container is a separate (virtual) computer than my laptop, how will I move files between the two?”, you may ask. Great question!
Inside of the container, your home directory (/home/cs1670-user, or
~) is actually a mount of the home directory inside your
<YOUR_DIRECTORY> directory. Any changes you make in one will be
visible in the other.
At this stage, you should test this out to make sure it works (and to make sure you understand what’s happening).
- Outside the container, go to the directory
<YOUR_DIRECTORY>/container-homeand create a file and a directory. - Inside the container, you should see the file and folder you created inside your home directory. Delete the file, and add a file to folder (again, this is just a test to see what’s happening).
- Look at the
<YOUR_DIRECTORY>/container-homedirectory outside the container–you should see the changes you made in this directory.
Help
- Outside of the container, in your
<YOUR_DIRECTORY>/container-homefolder:
$ touch cool_file
$ mkdir awesome_folder
$ cd ..
$ ./run-container- Inside the container:
cs1670-user@9899143429a2:~$ ls # Show the file and dir we just created
awesome_folder    cool_file
cs1670-user@9899143429a2:~$ rm cool_file
cs1670-user@9899143429a2:~$ cd awesome_folder
cs1670-user@9899143429a2:~$ touch even_cooler_file
cs1670-user@9899143429a2:~$ exit # or just CTRL-D- Back outside the container:
$ cd container-home            # this enters the mounted directory
$ ls                 # should just show awesome_folder
awesome_folder
$ cd awesome_folder
$ ls                 # should show even_cooler_file
even_cooler_file
Using shared folders
As you work on your code, you can take advantage of shared folders, for example:
- You could clone your repository and use git outside the container, rather than setting up SSH keys inside the container
- You can edit your code outside the container using your favorite graphical editor (VSCode, CLion, …) and the compile/run your work inside the container
Mac Users: files not updating in the container?
If you have issues with changes in shared files not updating inside the container, you may need to check your container file sharing settings. Docker has several methods for sharing files on MacOS–we recommend the VirtioFS method, which seems to be the most stable. To set it up, see here
If this doesn’t solve the problem, you can try this legacy version instead.
If issues persist, please post on Edstem or come to hours! Nick has been working on this problem and is curious to see any issues.
Note: if you move or rename your <YOUR_DIRECTORY> directory…
Your Docker container will still try to mount to the original
YOUR_DIRECTORY path, even after you rename, remove, or move the
folder YOUR_DIRECTORY.
After moving your YOUR_DIRECTORY folder, you’ll need to delete the
old container and start a new container. You can do so with:
./run-container --cleanYou should be able to enter a container, and see all of your work now!
Modifying the container
Once you have a shell inside the container, you can run any Linux
command as you would on any other Linux system. Feel free to play
around, install packages, etc. The user cs1670-user has passwordless
sudo access inside the container, so to install a package you can
simply run (eg. for vim):
sudo apt-get update
sudo apt-get install vim
We have pre-installed compilers for the languages you are likely to use in this class. As you work on your projects, please use the versions of the compilers installed here so ensure that we can replicate your work when grading. If you have questions about the environment and our grading procedures, please feel free to check with us.
Rebuilding the container environment (don’t do this now, but remember for later)
If you want to start a fresh container, close any container shells you
have open (eg. with exit), go to the <YOUR_DIRECTORY> directory
and run ./run-container --clean.
Running ./run-container --clean will remove any custom packages,
that you have installed and make a fresh container from the base
image. This is because --clean removes any existing cs1670
containers on your system.
If you have custom configurations for your packages, (e.g., a .vimrc
file for vim), the configurations are persisted even if you have used
--clean. This is because user-specific configurations are stored in
~ (or its sub-directories), which are located in the
<YOUR_DIRECTORY>/container-home directory on your machine.
Setting up git
We will manage code for our assignments using git. In this project, you’ll set up a git repository you’ll use for the whole semester, and download a starter project we’ll use to test your tools.
Setting up Github authentication
When using the container environment, we recommend using git from inside the container, which we find is most reliable–this is the method you likely used if you have taken other systems courses.
In this guide, we’ll quickly reference how you can get started using git in your container. For more background on using git, see CS300’s introduction for some links.
Task: Set up git inside your container by configuring your name and generating an SSH key, as follows:
Set your name and email in git:
cs1670-user@9899143429a2:~$ git config --global user.name "Jennifer Stevenson"
cs1670-user@9899143429a2:~$ git config --global user.email "jennifer_stevenson@brown.edu"
Follow these instructions from CS 300 on generating and adding an SSH key in your container. Come back to this once you’ve successfully SSH’d to
git@github.comfrom inside the container (at the end of the green box from the link).
At this point, your container should now be connected to github. Now we can get started cloning our assignment code! See the next section for instructions on how to do this.
Repository setup
You will be working with two repositories throughout the semester: one for project 0 (called the “setup” repo), and a main “projects” repo that you’ll use for all other projects.
In the next steps, you’ll set up both repos inside your container so they’ll be all set up for the rest of the semester.
Cloning your setup repo
Task: To clone your setup repo, do the following:
Open a terminal inside your container. If you had this terminal open from earlier, run the command
cd ~to switch to your container’s home directory, which is a good place to place your repo. Your terminal prompt should now look something like this:cs1670-user@e7bf87b33616:~$Create a repository by accepting this invite link.
On the repository page, click the Code button and copy the SSH URL for the repository (should start with
git@github.com:..., as shown in the figure below: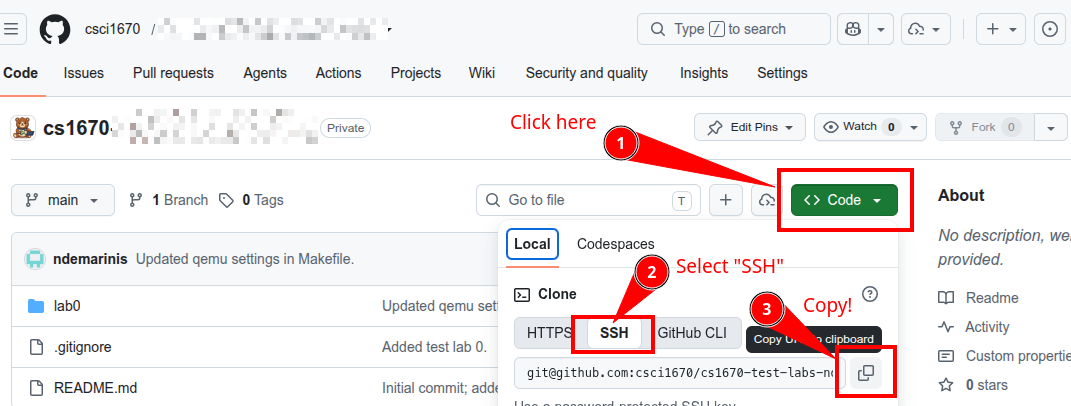
Clone the repository to a directory called
setup:git clone <paste the URL you copied> setup
You should now see a directory called setup inside your container’s
home directory. No need to open it yet, but we’ll start using it shortly!
Task: Now that you have cloned your setup repo, we can also clone your projects repo now. You can do this by following the same steps in the previous task, but with a different invite link:
In a container terminal,
cdto your home directory (cd ~)Create a new repo using this invite link.
Copy the SSH URL.
Clone the repo:
cs1670-user@e7bf87b33616:~$ git clone <paste your projects repo URL> projects
Connecting your container to VSCode (recommended)
If you use VSCode, or a similar editor, we strongly recommend you connect your VSCode to the container, which can it much easier to work on your projects and avoid a number of issues that can come up otherwise.
To connect your VSCode, do the following:
Attaching VSCode to your container
If you don’t have VSCode already installed normally on your computer (not inside the container), download and install it now.
Open VSCode as normal and navigate to the Extensions menu in the sidebar. (See the figure below to find it.)
Search for and install the Dev Containers extension, if it is not already installed. Here’s what it should look like:

Make sure your course container is running (Either by connecting to it with
./run-container, or checking the Docker Desktop app).In the bottom-left corner of your VS Code window, click the blue/green button and select Attach to Running Container. In the menu that pops up, select your course container.

Once you attach to your container, VSCode should open a new window, which should show
cs1670at the bottom, like in the figure below. This is a separate instance of VSCode, which lives inside the container. Any new files you edit or commands you run from this VSCode window will be run inside the container!
Your new container-based VSCode may take a moment to set itself up. When this finishes, open the Extensions menu again and install Microsoft C/C++ extension pack to set up helpful features like code completion, syntax highlighting, etc.
Testing your VSCode
Before continuing, it’s important to make sure VSCode can properly parse the C files in your repositories. To test this, we’ll open up the code before switching back to the rest of the lab:
If you haven’t already, open VSCode and attach it to the container (per the instructions in the previous section)
In the VSCode menus, go to File > Open Folder.. and browse to your
setupdirectory
After VSCode opens your folder, open any .c or .h file in the
kernel directory, which is our demo code for the lab! We’ll look
at this shortly, but, first, let’s make sure VSCode is set up to
parse it:
In the sidebar on the left, open the Extensions menu and install the “Microsoft C/C++ extension pack, which will set up helpful features like code completion, syntax highlighting, etc:
👀 Don’t skip this step! Many systems encounter an error at this step that can be hard to spot: look for an error box in the bottom-right corner of VSCode that says
cpptools client: couldn't create connection to server, like this (see instructions for fixing it below):
⚠️ If you get this error, click here for instructions
This error can occur because the VSCode C/C++ extension sometimes sets itself up with incorrect permissions, and then VSCode can’t start it properly. We can fix this by making your files within the
/extensionsdirectory executable, which allows VSCode to run it like a program.To fix this:
Open the VSCode terminal, or go to any other terminal inside your container (it should start with
cs1670-user)Run the following command:
chmod +x -R /home/cs1670-user/.vscode-server/extensions/After the command finishes, restart VSCode. If VSCode doesn’t re-open itself inside your container, you will need to attach it again–make sure the bottom-left corner says
cs1670.
Finally, we need to check VSCode’s parser. In the bottom-right corner of the VSCode window, click on the box that says “C” or “C++”. (There should be an icon next to it–either a
{}, or a spinning wheel.) This is the IntelliSense menu, which should look like this:
Make sure the IntellSense menu says IntelliSense: Ready and Parsing Complete, like in the picture. If it still says “scanning workspace…”, try waiting a minute for it to finish.
If your IntelliSense menu looks okay, your VSCode should be all set, yay! 😎
If the menu still says “scanning workspace”, try waiting 1-2min for it to finish (you can continue with the project while you wait). If it still doesn’t work, try the fix in the red box if you haven’t already.
If you still have issues, you can keep working on the lab and other assignments, but please follow up with us on EdStem or in office hours. We want to make sure you have a good set of tools!
When you are done
Your container should now be set up, yay! 🥳
Head back to the setup guide to finish setting up your code and testing your environment!
Getting help
If you have questions on any stage of configuring the container environment, please contact us by coming to office hours or posting on EdStem. We are happy to help! In addition, if you notice any components that were particularly unclear–or you solve any issues on your own–please let us know we can update the documentation. We really appreciate your feedback!
Additional resources
Here are some less-common tasks you might to perform with the container environment.
Stopping the container
If something goes wrong with a process running inside the container (sockets that are stuck open, zombie processes, with other running process state), you can stop the container and start it again. This forces Docker to kill all container processes.
To do this:
- Open a terminal on your host machine (or a WSL terminal on Windows)
- In your container repository, run
./run-container stopThis may take a minute or two. If you have any other container terminals (or a container-connected VSCode) open, close them. - Run
./run-containerto open the container again
Stopping the container will only stop any running container processes, it will not change any files inside the container. If you continue to have issues, you may want to consider resetting your container.
Resetting your container
If you have issues with your container filesystem, you can easily
reset it back to the original state when you downloaded the
image. This will destroy all changes to the container filesystem, but
not your YOUR_DIRECTORY/home directory.
To do this:
- Open a terminal on your host machine (or a WSL terminal on Windows)
- In your container repository, run
./run-container --cleanThis may take a minute or two. If you have any other container terminals open (or a container-connected VSCode), close them.
This should give you a shell in a fresh container. Note that any
changes to your container’s home directory (ie /home/cs1670-user)
are unaffected. If you want to reset any of these files back to their
original versions, you can download them from this
repo.
FAQ/Common Issues
Windows line endings (“unexpected end of file”)
If you see errors along the lines of bash: '\r': command not found
or bash: /home/cs1670-user/.bash_profile: line 5: syntax error: unexpected end of file when you running a file in your container
directory (such as setup-container, you may need to convert your
files’ line endings (characters that delineate the end of a line) from
Windows to UNIX (Linux) format.
To do so, do the following:
- Enter into WSL. You may do so by opening Ubuntu in the start menu
or through the
wslcommand. - Use
cdto navigate to the folder where you just cloned the setup repository. If you cloned your setup repository to your C: drive, usecd /mnt/cto enter the C: drive from your WSL. - Run
sudo apt-get update, then installdos2unixwithsudo apt-get -y install dos2unix. - Run
dos2unix ./setup-container(or whichever file is causing the error). - Try repeating whatever you were doing again. Hopefully, you shouldn’t get any errors anymore!
- If you still get errors and haven’t started using your container
yet, try running
dos2unixon every file in your container home directory, like this:find . -type f -exec dos2unix {} \;
Note: You may see a similar error when trying to run other files
from the container. If this occurs, run dos2unix on the file that
had the error and try again, which should correct the issue. If the
problem persists, feel free to post on Ed.
Filesystem Performance on Macs
Note: This fix relies on the VirtioFS file sharing mechanism in Docker/MacOS. To use it, you might need to update to the latest version of Docker, and possibly update your MacOS version.
We’ve noticed issues where Mac users have very slow filesystem performance inside the container–especially in the home directory, which is shared with your host system. Docker has several methods of filesystem sharing–we’ve seen improved performance by switching to the VirtioFS method. To do this:
Open the Docker app and enter the settings menu using the gear icon, which looks like this:

Under the “Choose file sharing implementation” select the VirtioFS method:

Click Apply & Restart. (If you have any containers running while changing these settings, you might need to stop them or restart your computer for the changes to take effect.)
Close the window and open the settings menu again. Make sure the box is still unchecked. If it isn’t, restart your computer and try again.
If issues persist, please post on Edstem or come to hours! (You can continue using the container for now, though.)
Legacy MacOS file sharing method
Note: On MacOS, we recommend using Docker with the VirtioFS filesystem option, which should provide better performance than the other options. If you encounter issues, Docker offers an older method that we have used in previous version of the course–it seems stable, but is quite slow.
Only use try this option if you have been directed to use it by the course staff.
Click to show
We’ve noticed an issue where Mac users have issues syncing files between their host system in the container (we’ll talk more about how file syncing works in a moment). To avoid issues later, we recommend that Mac users adjust their Docker settings as follows:
Open the Docker app and enter the settings menu using the gear icon, which looks like this:
Uncheck the box labeled “Use gRPC FUSE file sharing”, which looks like this:

Click Apply & Restart. (If you have any containers running while changing these settings, you might need to stop them or restart your computer for the changes to take effect.)
Close the window and open the settings menu again. Make sure the box is still unchecked. If it isn’t, restart your computer and try again.
If issues persist, please post on Edstem or come to hours! (You can continue using the container for now, though.)
Windows: using the container with WSL
Using docker with WSL can have some odd quirks, and there are certain configurations that can have slow performance. However, we’ve learned some best practices to help:
Some background: Docker on Windows relies on WSL (Windows
Subsystem for Linux), which works by running a Linux virtual machine
on your system, and then running Docker containers (like our course
container) inside it. When you run the command wsl, you are getting
a shell inside this VM.
Why it matters: This is important because the WSL VM has its own filesystem outside of your host system. You can navigate from one to the other quite easily, but in order to set up your files and find them later it’s important to know the difference:
- Your standard windows home directory (usually
C:\Users\YOUR_USER\on your host system) is located at/mnt/c/Users/YOUR_USERfrom inside WSL - Your WSL home directory is a completely separate directory
located at the path
~(shorthand for/home/YOUR_USER) in WSL. We recommend that you do your work from here–your container will run much faster this way! The caveat is that to access your WSL home directory from your host system, you need to look in a separate drive different from yourC:drive. If you haven’t done this before, see here for instructions.
When you enter WSL from the terminal, be sure to check which
directory you’re in. We recommend switching to your WSL home
directory (eg. cd ~) before you start cloning your repo:

If you want to find your files from outside WSL (ie, in the normal Windows file browser), you’ll need to locate your WSL home directory–see the next section for details.
Finding your WSL home directory in Windows
Your WSL filesystem is located in a separate drive from your C drive. To access your files there:
Open up your file browser and look in the sidebar on the left–you should see an entry labeled Linux, like the figure below. Expand it and find the entry matching your WSL installation (usually “Ubuntu”)

Inside your WSL drive (eg. “Ubuntu”), navigate to
home/YOUR_USER. This is your WSL home directory! As you work on files from WSL, you should see them here. For example, here’s where Nick’s container repository lives (under/home/deemer/cs1660/or~/cs1660in WSL):
Using git from WSL
There are many ways to use git on Windows. For best results, we
recommend running the git command from your WSL terminal. To do
this, you may need to set up an SSH
key
or personal access
token
in your WSL installation. If you have issues with this, let us know!
Configuring a WSL user
Important note: This section describes a method for fixing your
WSL configuration if your WSL starts up as the root user instead of
your personal user. These instructions are new as of Spring 2025 in
response to some new issues with WSL that have presented for some
students this semester.
If you encounter issues with these instructions, you aren’t sure how to proceed, or they don’t seem to make sense for your system, please feel free to pause and ask us on EdStem or in hours! These instructions are new, and we may not have seen all possible ways the problem can occur, so it’s possible your situation requires a different resolution. Please don’t hesitate to ask if you’re unsure!
On some Windows versions, we have noticed that WSL may not be configured with the proper user permissions when you first set it up. If this happens, you can follow these instructions to help check your WSL installation and set up a default user.
Checking your WSL installation
To see if you need to configure a WSL user, please do the following:
In a standard Windows terminal (Command Prompt or Powershell), run the command
wsl -l -v, which should produce output like this:C:\Users\you> wsl -l -v NAME STATE VERSION * Ubuntu Running 2 [ ... possibly more items after this ... ]You should see at least one of line of output with the name
Ubuntumarked with a star at the left:- If you do not have an entry
Ubuntu, run the commandwsl --install Ubuntuand try again - If you have an Ubuntu entry but there is no
*next to it on the left, run the commandwsl --setdefault Ubuntu
- If you do not have an entry
To continue testing, run the command
wsl. Once WSL loads, your terminal prompt should change color and look something like this:C:\Users\you> wsl you@system:~$Take a look at the terminal prompt (eg. the
you@system) part:- If the prompt starts with your username (eg. your Windows username, or some other username that you configured), your WSL user is configured correctly! You should be able to continue the rest of the guide as normal! If you are setting up your WSL installation for the first time, you should continue from here.
- If the prompt starts with
rootor ends with a#sign, your WSL user needs to be configured. Follow the instructions below to configure your user
Configuring your WSL user
If your WSL installation is logged-in as the root user, you will need to configure a user before you can continue setting up your container. To do this:
If you have not done so already, open a WSL terminal using the
wslcommand. The terminal should be running as therootuser.Pick a username you want to use for your user–it can be anything you want, but must use all lower-case letters (eg.
youruser)To create your user, run the following commands (replace
youruserwith your chosen username):root@wsl-system:~# useradd -m -s /bin/bash youruser root@wsl-system:~# usermod -a -G sudo,docker youruserThese commands create your user and give it permissions to use WSL and Docker. If this step was successful, you should not see any output printed in your terminal.
Before continuing, you will need to set a password for your user. To do this, run the following command (replacing
youruserwith your chosen username) and type/retype your password when prompted (Note: you will not see your password when you type it. This is normal.):root@wsl-system:~# passwd youruser Enter your password: Re-type your password:If you do not see any errors, your password was set successfully. If you encountered a problem and your password could not be set, simply try again.
Now that your user has been set up, we need to configure WSL to use it. To do this, run the following command (substituting
youruserfor your chosen username):root@wsl-system:~# echo -e "\n[user]\ndefault=youruser\n" | tee -a /etc/wsl.confThis commands adds some text to the end of the file
/etc/wsl.conf. To check that this worked successfully we can use the commandcatto look at the file, like this:root@wsl-system:~# cat /etc/wsl.confIf you see output that ends with the following, the file was edited successfully (where your chosen username should appear instead of
youruser):[user] default=youruserNow that your WSL installation has been set up, we need to test it. To do this, exit your WSL installation by running the
exitcommand. You should see your terminal prompt change back to a Windows command prompt, like this:root@wsl-system:~# exit C:\Users\you>If you attempted to open VSCode in your container previously, close VSCode now. This will ensure that it restarts properly after we finish fixing WSL.
Next, we need to restart WSL so it will restart with the new user. In your Windows command prompt (which should start with
C:or similar), run the following command:C:\Users\you> wsl --terminate UbuntuThis command will close any other WSL terminals you have open. If you receive an error message from Docker about WSL being disconnected, click Restart: this should restart and reconnect Docker to WSL.
Finally, to test your installation, re-enter WSL using
wsl. You should now see your terminal switch to a blue-green prompt that includes your chosen username, like this:
If your WSL prompt shows
rootinstead of your user, please check the following:- Make sure your
wsl.confuses the correct username from step 5 - Make sure you restarted WSL with
wsl --terminate. You can also try restarting your computer - If your WSL user remains
rootafter this, please follow up with us on EdStem and we can debug further.
- Make sure your
One final step: we need to make sure that Docker works properly inside WSL. To do this, run the following command:
youruser@wsl-system:~$ docker infoYou should see a bunch of version information about your Docker setup. If you see some warnings/errors about
blkio, this is safe to ignore. However, if you see an error like:ERROR: Cannot connect to the Docker daemon at unix:///var/run/docker.sock ...this means that Docker has not yet configured itself properly inside WSL. To fix this:
- Open your Docker Desktop app and go to Settings (top right corner), then > Resources > WSL Integration and then enable the integration for Ubuntu (if it is not enabled already), then try again.
- If issue persists, try restarting your computer, and then ask the course staff on EdStem.
Phew! Now that your WSL user has been configured and you have confirmed that Docker is connected, you’re ready to proceed with the rest of the project! If you are just starting, you should be able to resume from here. If you encounter issues, please feel free to follow up with us in hours or on EdStem.
Windows performance and stability issues
About the problem
It seems that there has been a huge memory leak in Docker on WSL (the Windows subsystem that provides Linux support) since at least August 2022. This is not specific to this course, but a larger problem with these systems. There seem to have been some fixes for this problem, but it’s not fully solved yet. You can read about this here and here.
To check if this is happening, you can open Task Manager and check
how much memory is being allocated to WSL’s VM (Vmmem) and Docker:

If left unchecked, WSL and/or Docker can consume a lot of memory. This can cause problems that are hard to predict, but usually end up causing programs to hang or crash.
What can we do about it?
While there isn’t a complete fix for the issue yet, there are some workarounds we can use to make Docker+WSL’s memory usage more manageable and prevent it from slowing down the rest of your system.
There are two types of workarounds:
- Setup changes (do these now): You can adjust some settings now to help control docker’s memory usage as you work on the projects
- As-needed fixes (skim now, then run as you need them): If the Docker’s memory usage gets particularly bad, there are some commands you can run to help bring it under control and get your system back
Please report about your experiences with this issue! We’re working to understand this problem and the best ways to solve it. As you work on the project, please post about your experiences. We want to know what’s working and what isn’t!
Setup changes
Workaround 0. Make sure Docker is up to date
If you installed Docker for a previous class, you should make sure that you install the latest version–there seem to have been some fixes, so it’s best to make sure your Docker is as up-to-date as possible. To do this, we recommend downloading and reinstalling docker from Docker’s website.
Workaround 1: Limit WSL’s memory usage
It’s possible to limit the total amount of memory WSL can use–this won’t stop the leak, but it will at least prevent WSL from making your system totally unusable.
You can set a memory limit by editing WSL’s config file. To do this, take a look at this guide (specifically, this section), which seems to have good instructions and a good way to verify the memory limit is set correctly. For full details on the WSL config file, see here.
How much memory should you assign to WSL? It depends on how much memory you have on your system, and how much WSL stuff you want to run at once. If you have 8-16GB of memory on your system, set a limit of 2-4GB and increase it if you have issues.
As-needed fixes
Quick fix 1: Force WSL to clean up some memory
WSL is actually a lightweight Linux virtual machine (VM) that lives on your system, which runs a modified Linux kernel that does memory management for the processes inside WSL. To help keep the memory usage in check, we can ask WSL kernel to help cleanup unused pages in the memory (info here and here), like this:
Open a WSL terminal (Open Command Prompt/Powershell > Enter
wsl)Enter the following command (when prompted, enter the password you use to log into Windows):
echo 3 | sudo tee /proc/sys/vm/drop_caches
- After you run the command, you will not see any terminal
output. However, you should see
Vmmem’s memory usage decrease in Task Manager.
Quick fix 2: Shutdown WSL when you’re done working (or when it gets slow)
When you’re done working on the container, or you get sick of how much memory WSL is using, you can shut it down completely like this:
Save any files you have open in any container/WSL shell.
Open Command Prompt/Powershell (no need to run
wsl)Run
wsl --shutdown. This will stop the WSL system and any containers, freeing up all memory. You will lose any active state in any containers (but not saved files).
After you shutdown WSL, Docker will complain that it was disconnected from WSL. To continue using Docker, close and restart the Docker desktop app.
Extra: Building the container image manually
Our container environment loads a pre-built “image” from our course
repository that holds all of the files and settings in our
container. This image serves as a read-only “template” for all
containers you create with ./run-container.
If you want to build the image locally instead, you can run:
$ ./run-container build-image
This will manually create the image using a Dockerfile and setup
scripts in the docker directory. See those files for more details.
If you want to remove your container image to save disk space, you can run:
$ ./run-container clean-image
Attribution
This setup is a modified version of the setup used by CSCI0300 and reused with permission, which is based on Harvard’s CS61.