Native macOS environment setup guide
This guide describes how to set up your development environment if you use MacOS. Normally, our systems courses at Brown require setting up a Docker container that contains all of our course tools, and provides a consistent environment to run our code.
However, since all of the development in our course will run in a virtual machine (QEMU) or on a Raspberry Pi, we don’t require many resources from the host system, and, if you use MacOS (a Unix-based operating system), your OS already supports most of what we need! This guide will explain how to set up the remaining components: QEMU, and our C compiler, and test them out to make sure they work.
⚠️ Heads up: This development environment strategy is new – we’re offering it because we have hope that it can make some forms of development easier than using a container, which is actually challenging to use with Raspberry Pi hardware. With this in mind, please remember the following:
- If you encounter issues with your development environment, please let us know! As part of your submission this project, you’ll be asked to fill out a form to tell us about your setup experience. If you encounter issues after project 0, please let us know by posting on EdStem or coming to office hours! We want to help make things go more smoothly, but it’s hard to control for differences in everyone’s systems – we won’t know about problems unless you tell us!
- If you run into problems, or you don’t want to install tools on your local system, you can always use the container environment. We hope this won’t be necessary for MacOS users, but the option is there if you need it. To set up the container, see the instructions linked from project 0.
Setting up homebrew
We’ll install the tools we need using Homebrew,
which is a common package manager (a tool designed for installing
software) maintained installing common Linux tools on MacOS. If you’ve
used apt or apt-get before in a Docker, you’ll find homebrew
familiar–homebrew behaves similar to apt, but it’s designed for
Macs.
If you don’t already have homebrew installed, you’ll need to set it up
before continuing. (You can check by running the ./check-host-system
script.) To install Homebrew:
Open a terminal and run the install command on Homebrew’s website. This command downloads a script that runs the installer
When the installer finishes, it will give you some commands to run to modify your system’s shell to find homebrew. (The exact commands will differ depending on how your system is set up, so we can’t tell you what they are.) Read the output from the installer and follow the instructions to modify your shell. We’ll test your setup in the next step.
Once you have finished modifying your shell, open a new terminal tab and run the following command:
brew config
If you see a bunch of version information, your homebrew is properly set up, yay! If not, go back to the terminal tab you used for the installation and check for any errors or instructions.
Installing our tools
Now that we have homebrew installed, we can install the tools we’ll need for development. To do this:
In a terminal on your mac, run the following command:
brew install aarch64-elf-gcc make gdb binutils minicom qemu clang-formatThis installs the following packages, some of these you’ve likely heard about before 😄 :
make,gdb: which we need to compile and debug our programsqemu: the QEMU emulator, to run our programsaarch64-elf-gcc: A version of GCC (i.e., a C/C++ compiler) set up for bare-metal ARM64 systems, like our Raspberry Pibinutils: contains several utility programs to work with compiled object files–an example you might have seen isobjdump, which prints out the assembly code in a compiled binary. Together with GCC, this makes up our toolchain, which is the set up programs we need to compile and run C programs on our Raspberry Piclang-format: Can automatically format your code based on industry-standard C styling conventions. Our makefiles use this when you runmake format.
The installation process will print a lot of text to the terminal as it runs. When it finishes, check the last screen’s worth of output for any errors. You might see a long list of “caveats”, which are notes about individual packages–these aren’t a problem, as long as you don’t see text indicating errors.
If the install process succeeds, your toolchain and support programs should be set up, yay!
Setting up git
We will manage code for our assignments using git. In this project, you’ll set up your git repositories for the whole semester, and download a starter project we’ll use to test our tools.
In our course, we recommend that you use Github using SSH keys, which may or may not already be configured on your host system. In this next task, we’ll check your setup, and install an SSH key if needed.
If you prefer to authenticate with Github using other methods (e.g., Personal Access Tokens), you are welcome to do so, but please note that our course staff may not be able to debug issues involving them.
Task: Make sure you can authenticate to github via SSH. To do this:
In a terminal you normally use for coursework, run the following command:
ssh -T git@github.com- If you get an error, (e.g.,
Permission denied (publickey)), you need to set up an SSH key. - If you get a message from Github that says you authenticated successfully (it will print your username), you’re all set! Skip to the next step.
- If you get an error, (e.g.,
If you need to set up an SSH key, follow these instructions from CS 300 on generating and adding an SSH key on your machine. Come back to this once you’ve successfully SSH’d to
git@github.com.- Note: when generating a key, you may receive a prompt to overwrite an existing key, indicating you already have a key set up on your system. If this happens, it’s okay to say “no” and upload your existing key to Github instead of generating a new one.
At this point, your computer should now be connected to github. Now we can get started cloning our assignment code! See the next section for instructions on how to do this.
Repository setup
You will be working with two repositories throughout the semester: one for project 0 (called the “setup” repo), and a main “projects” repo that you’ll use for all other projects.
In this course, we recommend that you clone your repositories in the the dev environment repository you cloned earlier: (the next section will describe how to set this up):
 - ...
 |--DEV-ENVIRONMENT
 | |--check-host-system
 | |-- ...   <--------------- Your repos here!
 | |--util/
 | |-- ...
 ...
The next sections will describe how to set up your repositories.
Setting up your repo
Task: To set up your setup repo, do the following:
Open a terminal and
cdto the development environment repository you cloned earlier (e.g.,<YOUR_DIRECTORY>).Create a repository by accepting this invite link.
On the repository page, click the Code button and copy the SSH URL for the repository (should start with
git@github.com:..., as shown in the figure below: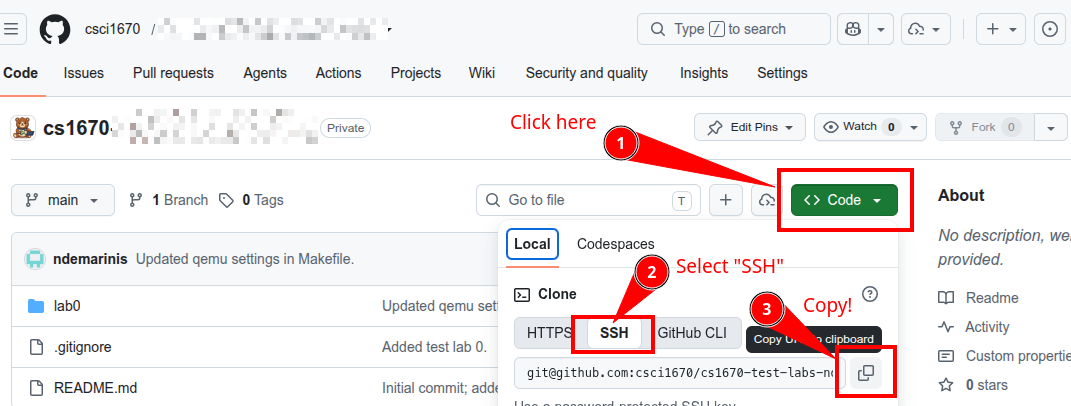
Clone the repository to a directory called
setup:git clone <paste the URL you copied> setup
You should now see a directory called setup inside your development
environment repository. No need to open it yet, but we’ll start using it shortly!
Task: Now that you have cloned your setup repo, we can also clone your projects repo now. You can do this by following the same steps in the previous task, but with a different invite link:
cdto your dev environment repoCreate a new repo using this invite link.
Copy the SSH URL.
Clone the repo:
git clone <paste your projects repo URL> projects
VSCode setup (recommended)
If you use VSCode, it’s important to make sure VSCode can properly parse the C files in your repositories. To test this, we’ll open up the code before switching back to the rest of the project:
If you haven’t already, open VSCode
In the VSCode menus, go to File > Open Folder.. and browse to the
setupdirectory (not your Desktop, notcs1670)After VSCode opens your folder, open any
.cor.hfile in the kernel directory, which is our demo code! We’ll look at this shortly, but, first, let’s make sure VSCode is set up to parse it:In the sidebar on the left, open the Extensions menu and install the “Microsoft C/C++ extension pack, which will set up helpful features like code completion, syntax highlighting, etc.
Finally, we need to check VSCode’s parser. In the bottom-right corner of the VSCode window, click on the box that says “C” or “C++”. (There should be an icon next to it–either a
{}, or a spinning wheel.) This is the IntelliSense menu, which should look like this: Make sure the IntellSense menu says IntelliSense: Ready and
Parsing Complete, like in the picture. If it still says “scanning
workspace…”, try waiting a minute for it to finish.
Make sure the IntellSense menu says IntelliSense: Ready and
Parsing Complete, like in the picture. If it still says “scanning
workspace…”, try waiting a minute for it to finish.
If your IntelliSense menu looks okay, your VSCode should be all set, yay! 😎
If the menu still says “scanning workspace”, try waiting 1-2min for it to finish (you can continue with the project while you wait).
If you still have issues, you can keep working on the project and other assignments, but please follow up with us on EdStem or in office hours. We want to make sure you have a good set of tools!
When you are done
If you are installing your tools for the first time, head back to the Setup Guide to test your installation!
Troubleshooting
FAQs and common issues will go here!